Documentation
Weblog - Blogging Extension for Opencart
- Version: 4.0.0
- Compatibility: Opencart 2.x.x, 3.x.x
- Author: Leverod.com
- Created on: August 25, 2016
Getting Started
Thank you so much for purchasing this extension.
Weblog is a complete blogging system for Opencart that allows you to write posts quickly and easily. It is designed to be installed and configured even by users that are not web developers.
This documentation contains all you need to properly install and configure the extension.
Installation
Check your Opencart version before installing the extension. The extension is available for the Ocmod and vQmod modification systems.
OCMOD Instructions
Fresh installation
On Opencart 2.0.0.0 and 2.0.1.0 the Opencart modification system had some bugs, solved from Opencart 2.0.1.1 (see https://github.com/opencart/opencart/issues/2436).
If you use Opencart 2.0.0.0 or 2.0.1.0, we recommend you to use one of the following options:
-
Update the modification system of your site by downloading zip installer of Opencart 2.0.1.1 and copying the file admin/controller/extension/modification.php to the same folder of your site. We recommend you to use the file of Opencart 2.0.1.1 because newer Opencart versions may no longer be compatible with Opencart 2.0.0.0 and 2.0.1.0.
-
Alternatively, use the vqmod version of the extension, available from the file download list on the marketplace where you purchased the extension (Opencart.com or Leverod.com).
The extension does not overwrite any files of your Opencart installation. However, it is a good idea to make a backup of files and databases before installing any extension. This makes it easier to restore the site in case of problems.
-
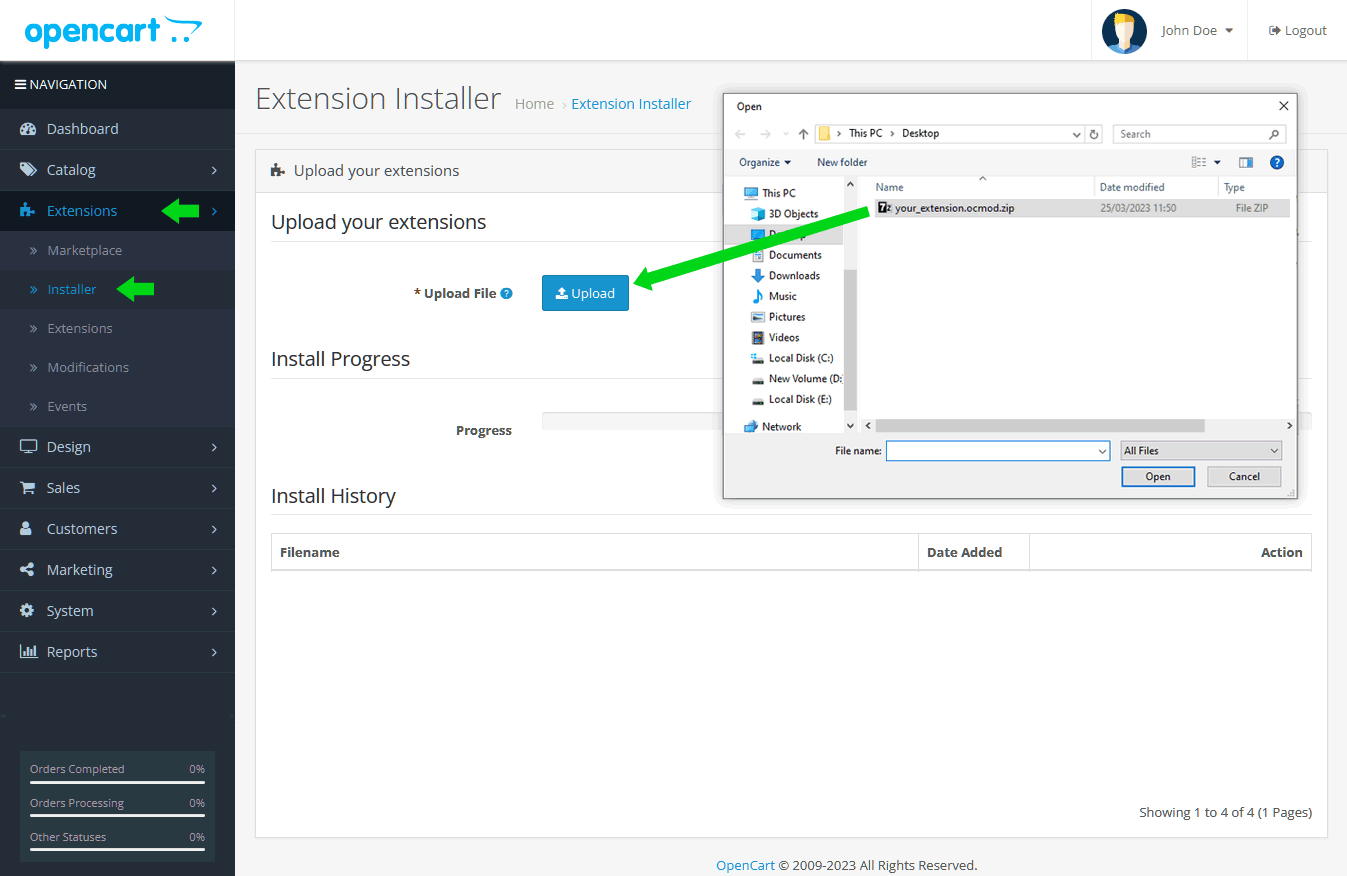
Log in to your site's administration panel;
-
Go to Extensions > Installer and upload the file weblog.ocmod.zip as shown in the picture:
-
Refresh the cache of the modification system from Extensions > Modifications:
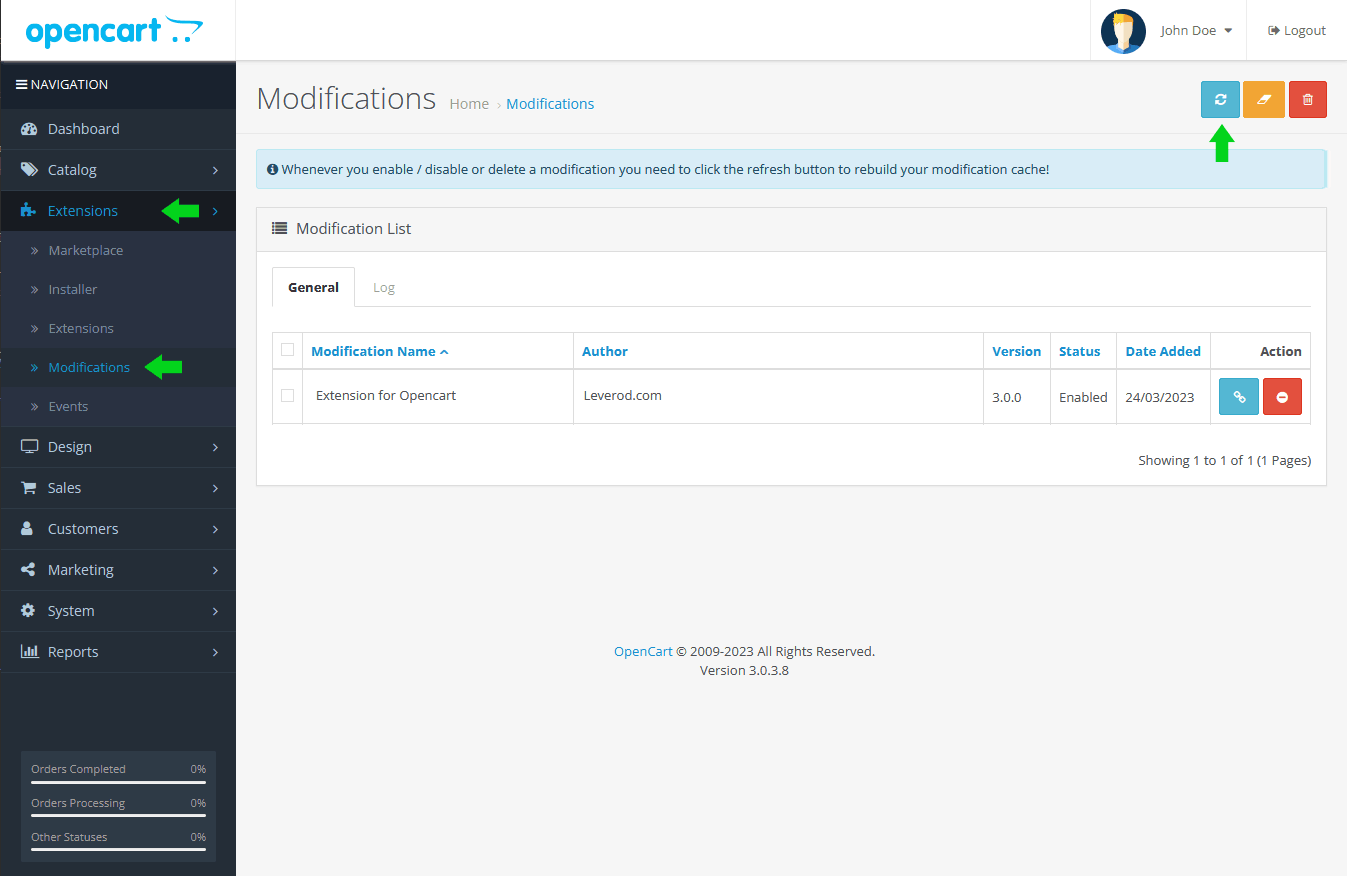
If the installation was successful, you should see the Weblog logo in the left menu of the administration panel. Now you can start configuring the extension.
Update from a previous version
If you are updating the extension from a previous version, uninstall the old version first.
Uninstallation
To uninstall the extension:
-
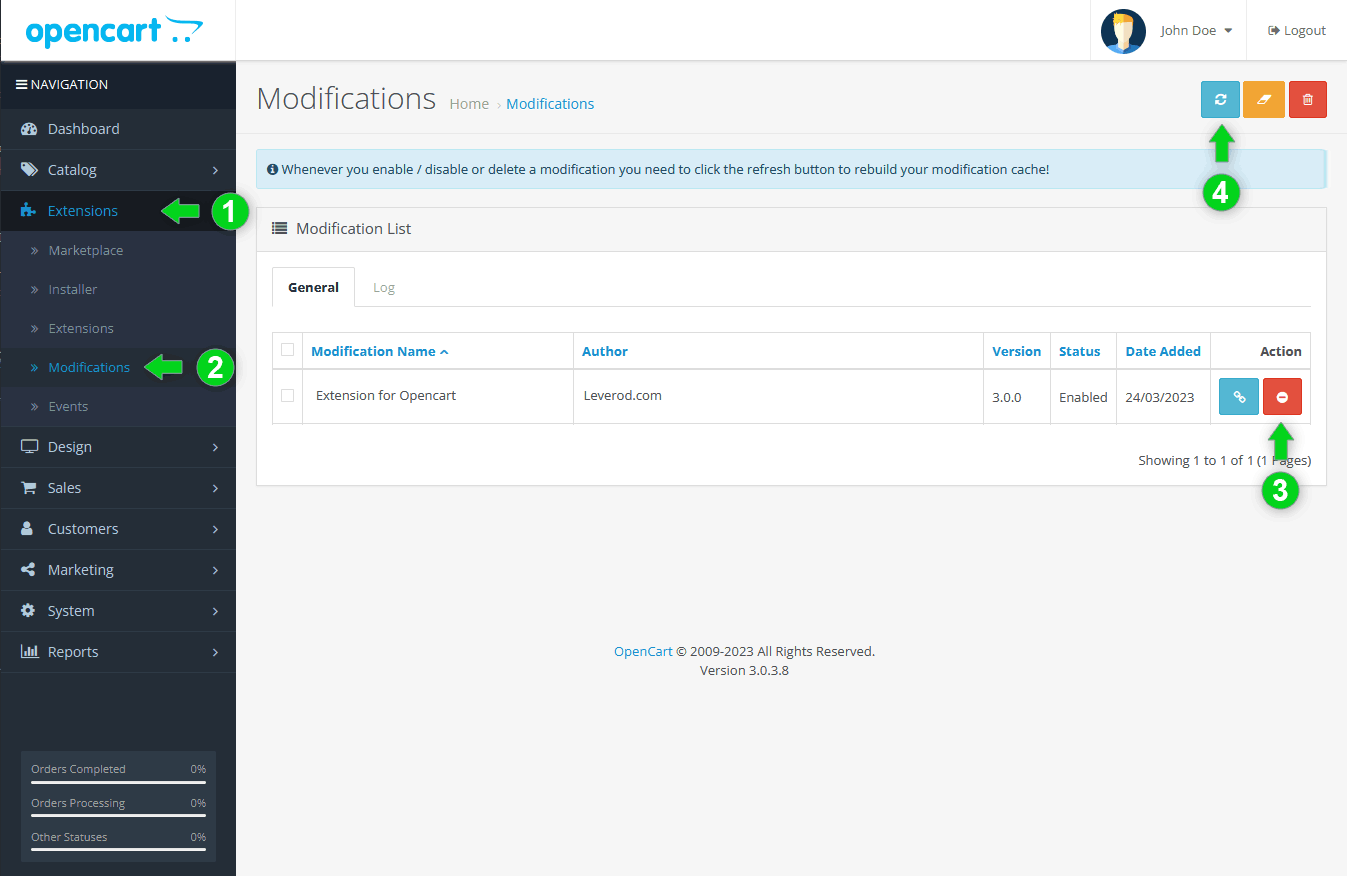
Log in to your site's administration panel;
-
Go to Extensions > Modifications;
-
Find the extension in the Modification List and click on the red button Disable (3);
-
Refresh the modification cache (4).
VQMOD Instructions
Weblog is also available as a vqmod extension.
vQmod is a modification system that can be used as an alternative to Ocmod.
vQmod can be downloaded here: https://github.com/vqmod/vqmod/releases
You have to choose the latest vqmod version for Opencart.
vQmod installation instructions: https://github.com/vqmod/vqmod/wiki/Installing-vQmod-on-OpenCart
Fresh installation
To install Weblog as vqmod extension:
-
Unzip the file weblog.vqmod.zip
-
From the file manager of your hosting control panel (or from any FTP client), copy the content of the folder upload in the root folder of your site (the content of that folder, not the folder itself).
Update of a previous version
If you are updating the extension from a previous version:
-
Uninstall the old version first;
-
Follow the same installation instructions as in the Fresh Installation section;
-
During the installation process you will be prompted to overwrite the old extension files with the new ones.
Now that the installation is complete we can configure the extension.
Configuration
The following paragraphs will show you how to configure the extension.
General Settings
The first page to open to allow the extension to be initialized and work properly is the settings page.
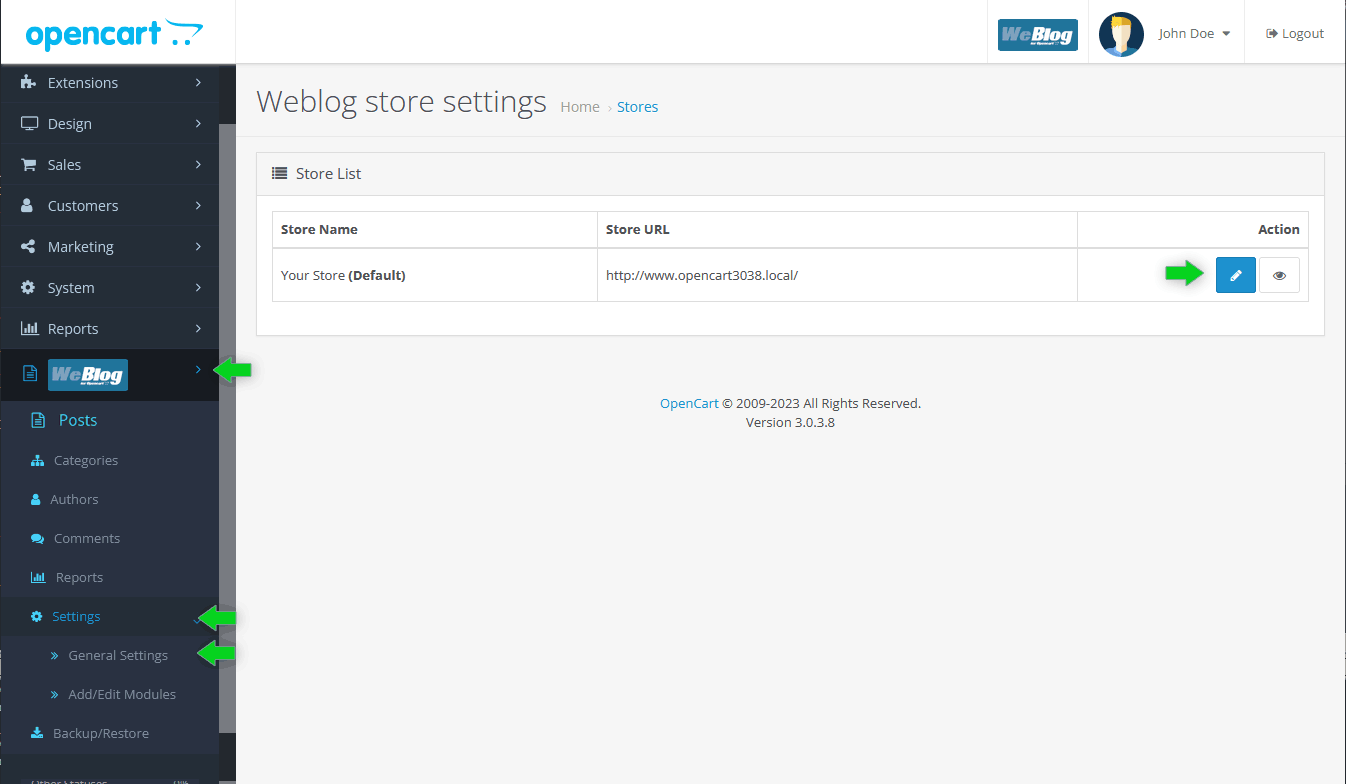
From the left menu of the Admin panel, click on the Weblog icon, then go to Settings > General Settings.
The extension is multistore, if you have more than one store installed, you will see a row for each of them. Click on the Edit icon to begin the configuration.
The Setting edit page has three tabs:
- General tab
- Language tab
- Color tab
Let's examine them one by one.
General tab
Within this tab you will find all the settings that apply globally to the blog.
Paths and Links
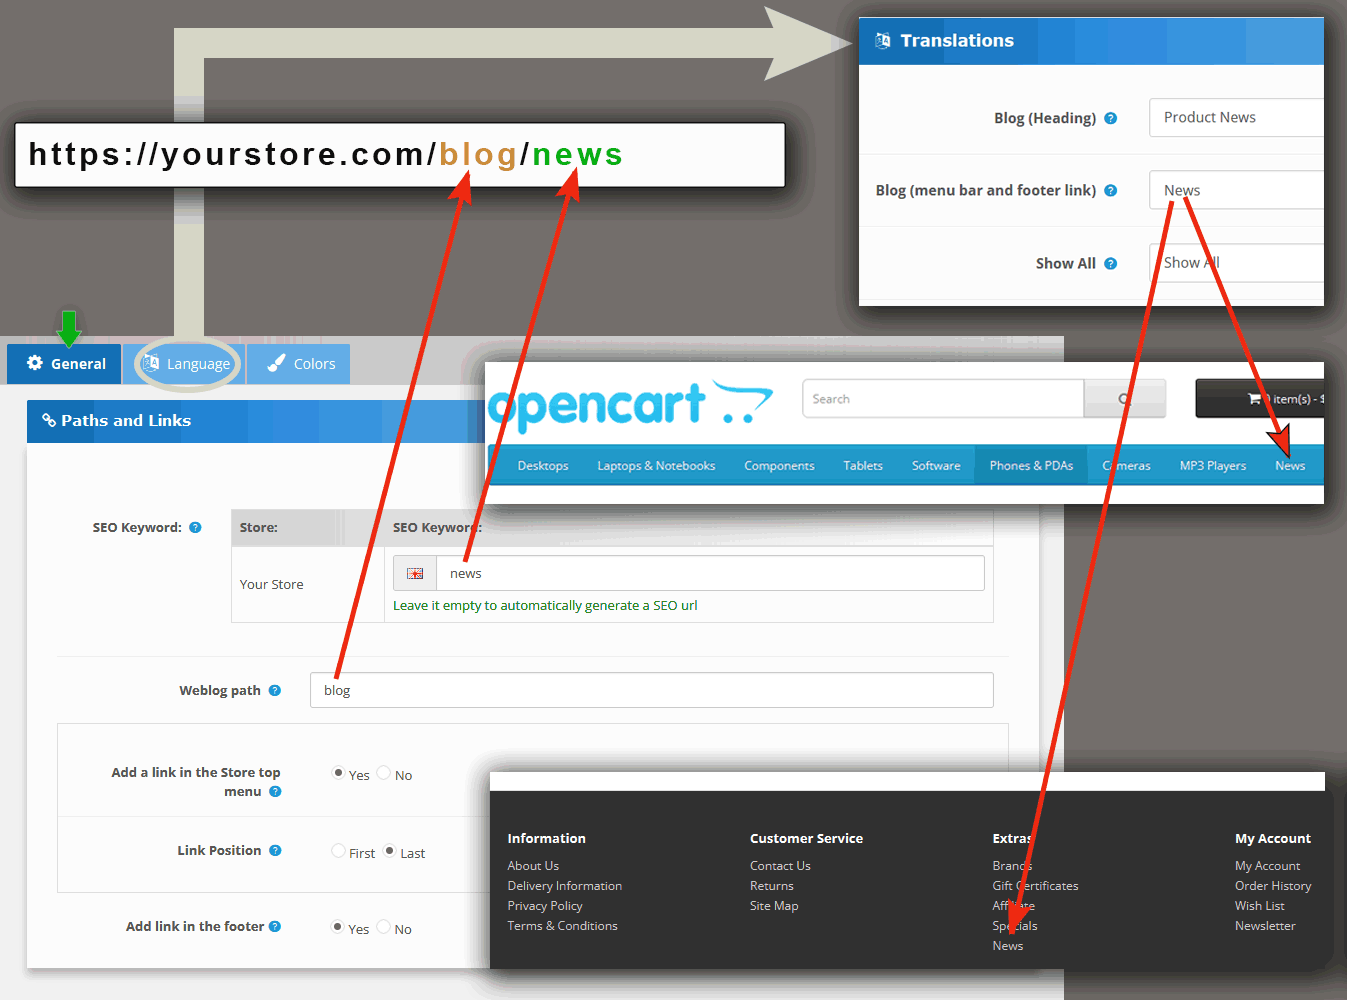
Let's make an example on this url: https://yourstore.com/blog/news to understand how to configure urls on your blog.
-
Seo keyword: it's the base name of your blog main url (the "last word" of the url).
Note: the word news of this example is the keyword displayed in the url, not the text displayed on the web page. The link text can be configured from the tab Language > Translations.
-
Weblog Path: it's the blog path, a sort of "virtual folder" within which all the pages of the blog are placed.
Although it is possible to omit the blog path and have urls like https://yourstore.com/news, it's strongly recommended to set a path, to eliminate the risk of having urls of blog pages identical to other urls on the site.
-
Link position: choose whether to place the link (at the beginning or end of the menu).
-
Add link in the footer: choose whether to place a link in the footer of your site.
Weblog top menu bar
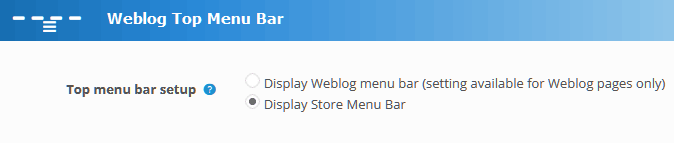 With this option you can customize the top menu bar of the site so that it shows blog categories instead of product categories.
This option is available only for blog-related pages, (latest news, popular news, blog categories, author pages etc.).
All other pages on the site (home page, products, categories, etc.) will continue to show the store menu.
With this option you can customize the top menu bar of the site so that it shows blog categories instead of product categories.
This option is available only for blog-related pages, (latest news, popular news, blog categories, author pages etc.).
All other pages on the site (home page, products, categories, etc.) will continue to show the store menu.
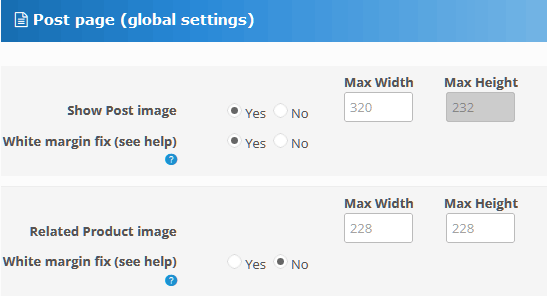
Post Page (global settings)
This section allows you to configure certain features that apply globally for all blog pages.
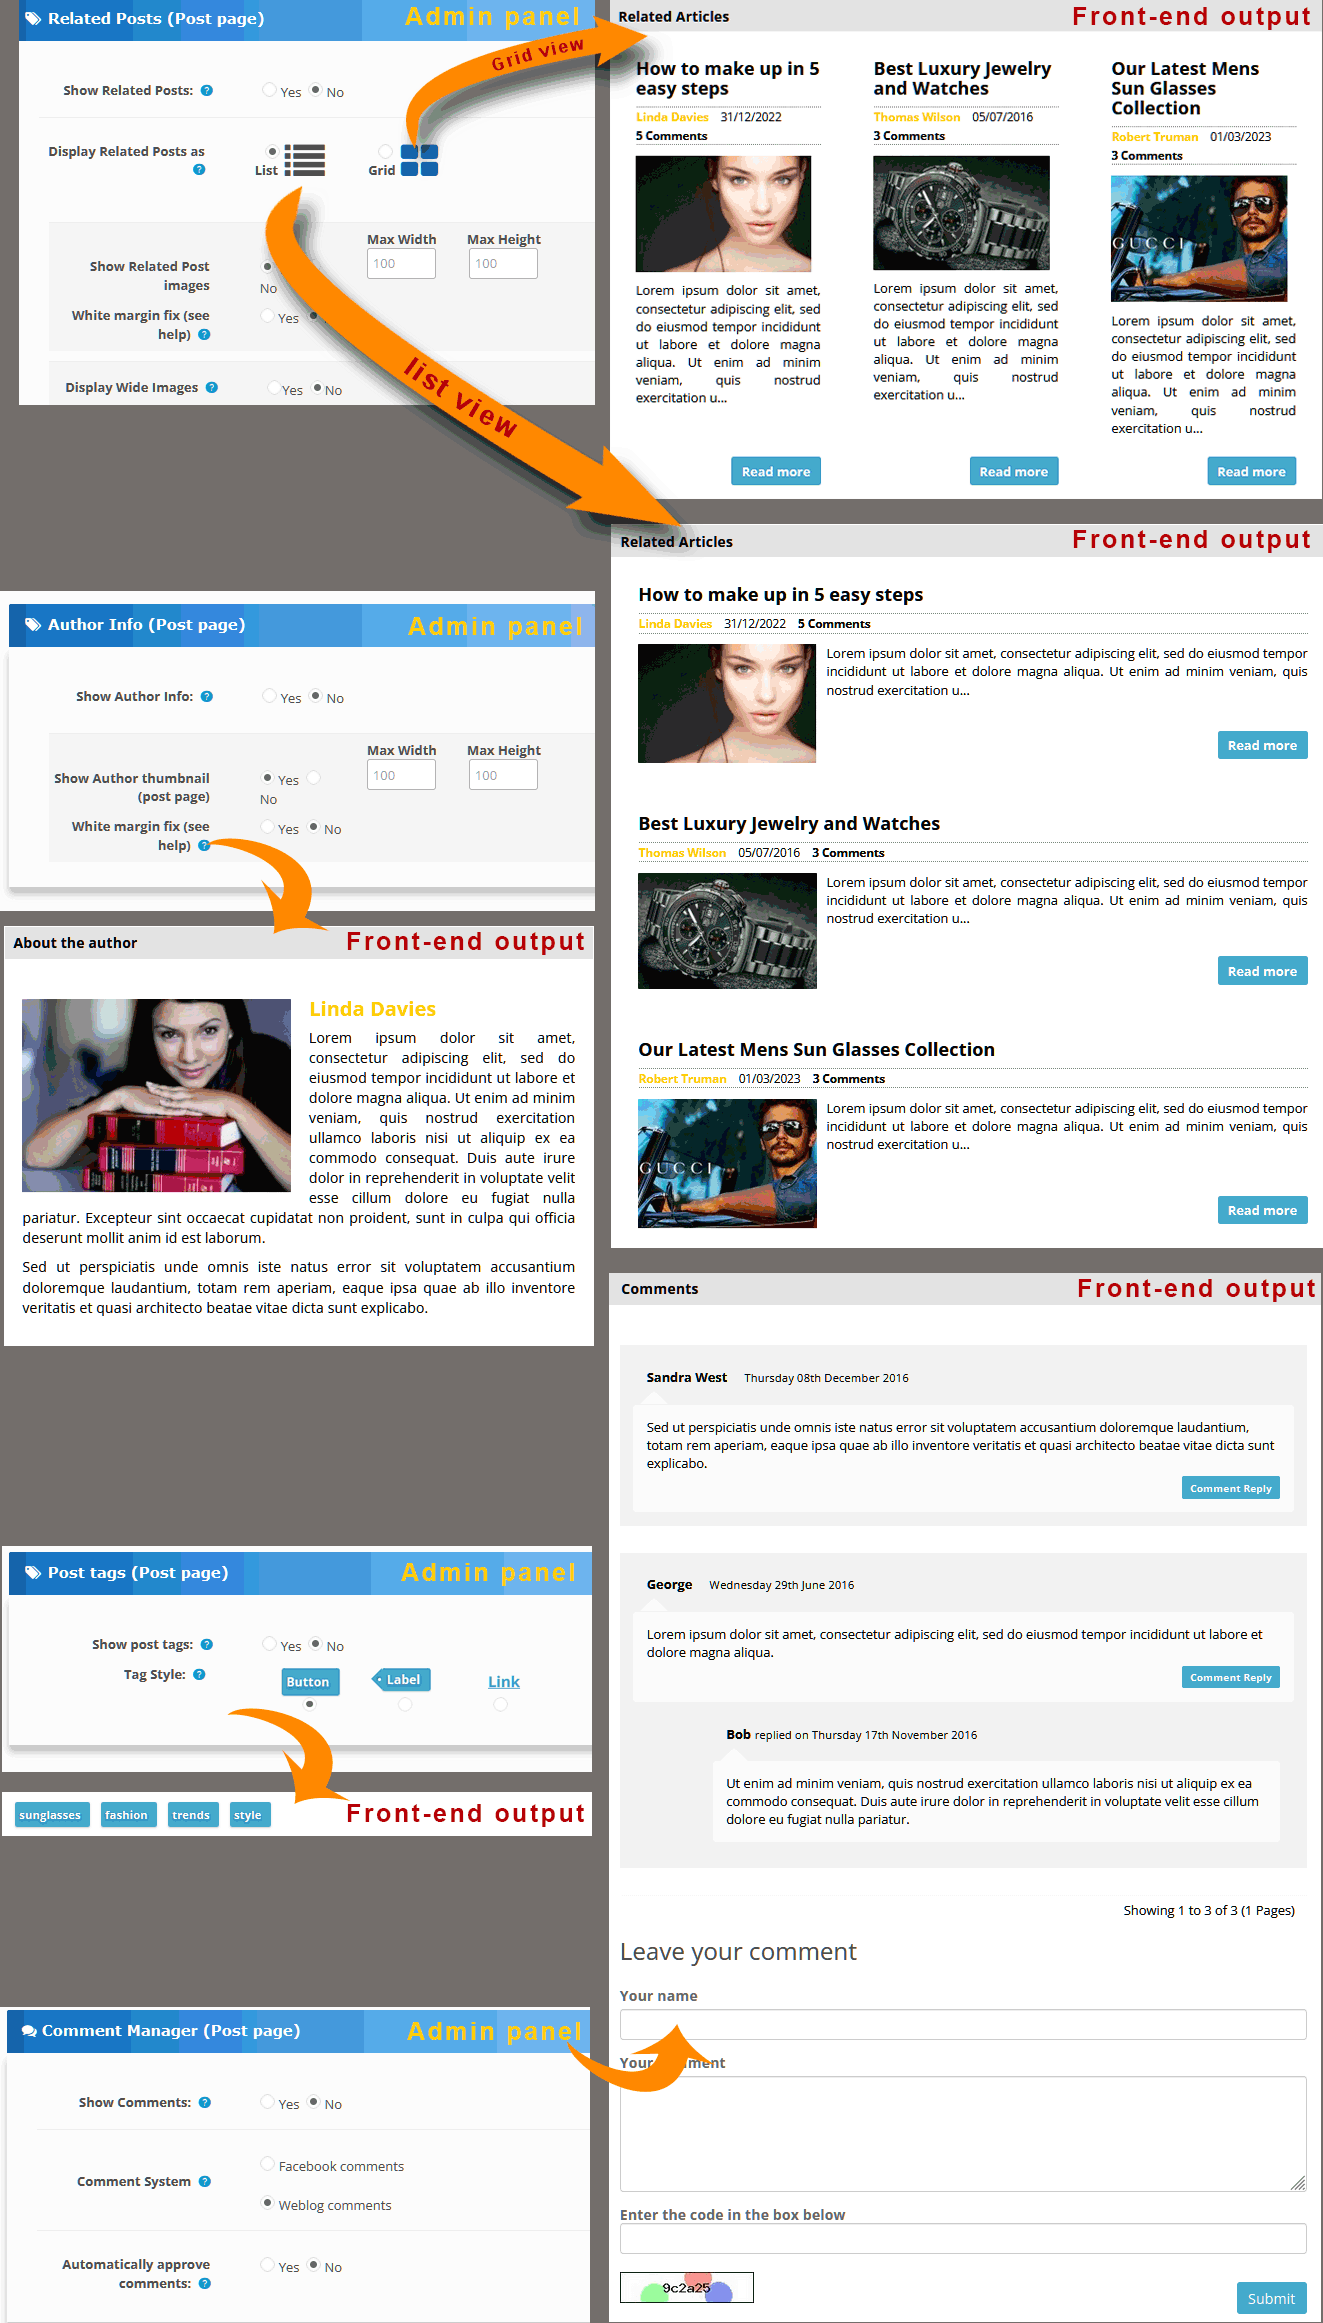
The section consists of five parts (for better understanding refer to the pictures or open the extension control panel):
-
Post page
-
Show Post image: Show/hide the main post image and set the size.
-
Related product image: you can assign to each post a list of products to show immediately after it. (see the section Edit a blog post to learn how to do). With this global setting you can set the max image width/height of post related products.
-
-
Related posts: Below each post you can show a list of related posts. From this panel you can configure the style which applies globally (image sizes, list/grid view).
-
Author info: You can also choose to show information about the author of the post (to learn how to set up an author's profile go to the section Authors).
-
Post tags: This option allows you to configure the style of post tags (button, label or link). Tags will appear after the post text. To learn more about post tags and how they can be useful for SEO, click here.
-
Comment Manager: This option displays comments after the post content. You can choose between two systems, Weblog comments and Facebook comments (see the last part of the below image).
When the radio button "Automatically approve comments" is set on no, comments must be approved by the site administrator before being published.
The following image shows the admin panel sections Related posts, Author info, Post tags and Comment manager and the front-end results:
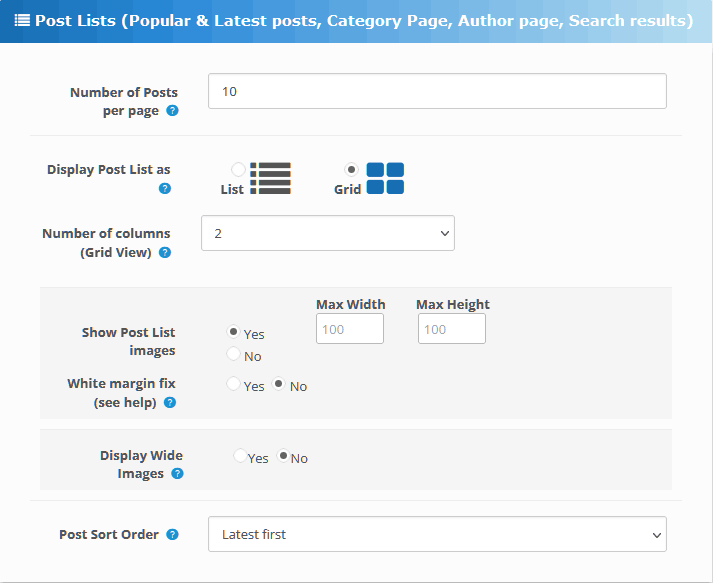
Post Lists
Post lists are displayed in the following pages:
- Latest Posts;
- Popular Posts;
- Search page (it's the list of posts returned by the blog search bar);
- Post Category Page (list of posts shown in the blog category pages);
- Author Page (the author page can display, together with the author profile the list of his posts).
Post lists can be displayed as list or grid, you can choose whether or not to show post main images and configure size and position. For the grid view you can choose the number of columns to divide the grid into.
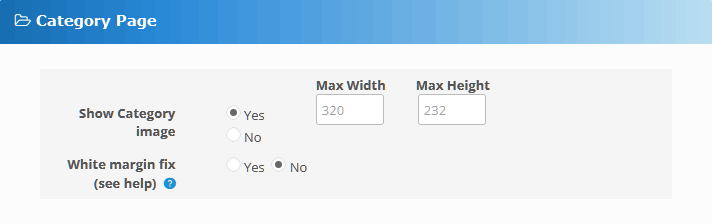
Category Page
On Category pages you can show/hide the main category image and set its size.
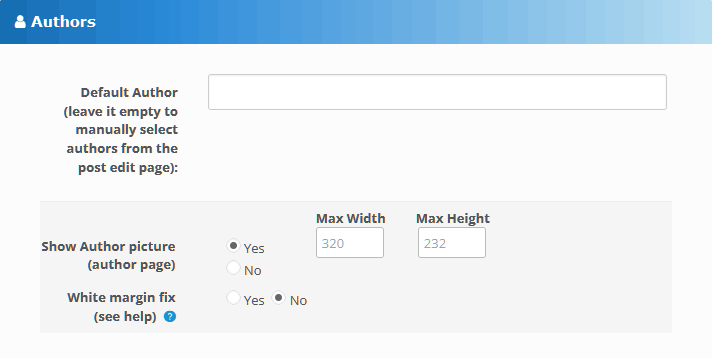
Authors
Each time you write a post, from the Post Edit page (tab Data) you are asked to enter the author's name (it is chosen from the list of authors previously added from the Author page.
If you don't want to set an author every time you write a post, you can use this feature to set a default author for all posts. You can still change it from the post edit page.
You can also show the author's picture and set its size.
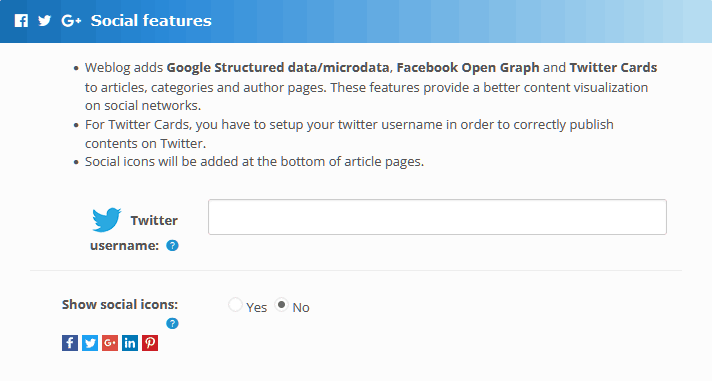
Social Features
When this option is enabled, Weblog adds Social network icons after post texts. The blog supports Google Structured data, Facebook Open Graph and Twitter Cards, for a better content visualization on social networks. For Twitter cards, you have to setup your Twitter username in order to publish contents.
Misc
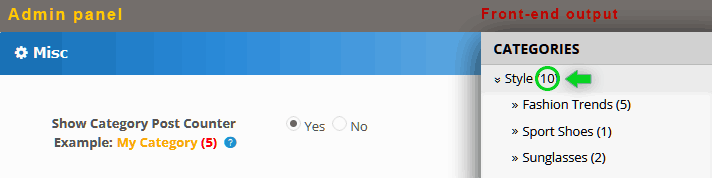
The option Show Category Post Counter displays a counter with the number of posts for each category.
Blog category lists can be created through the module Post Category Module.
Language tab
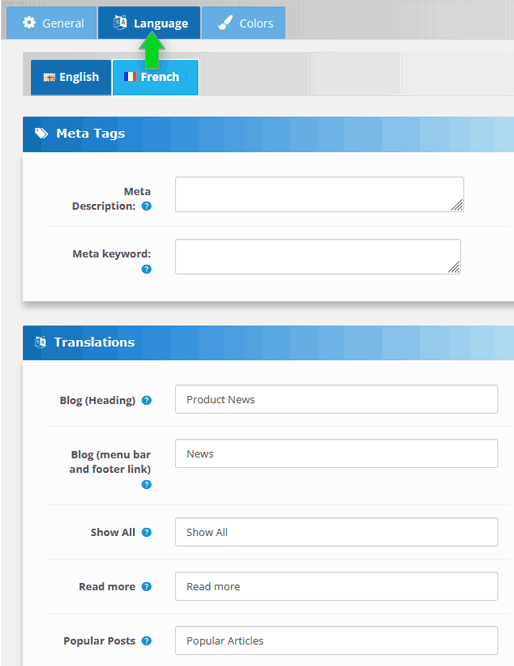
The Language tab allows you to translate all the texts that is part of the Weblog structure (headers, buttons, error messages, etc.) directly from the control panel, without the need to edit any language files.
If you have a multi-language site, within the language tab you will see an additional tab for each language installed on the site (English translation is already configured).
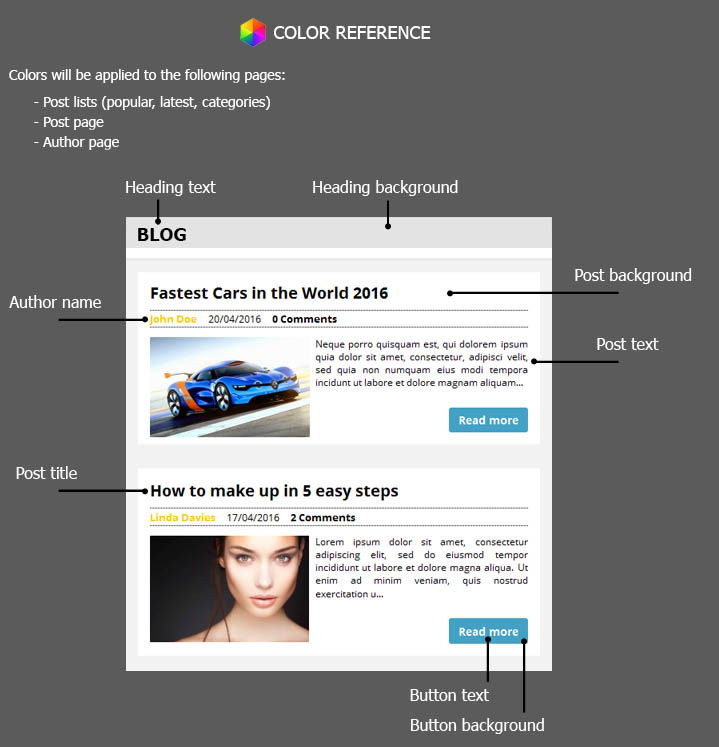
Color tab
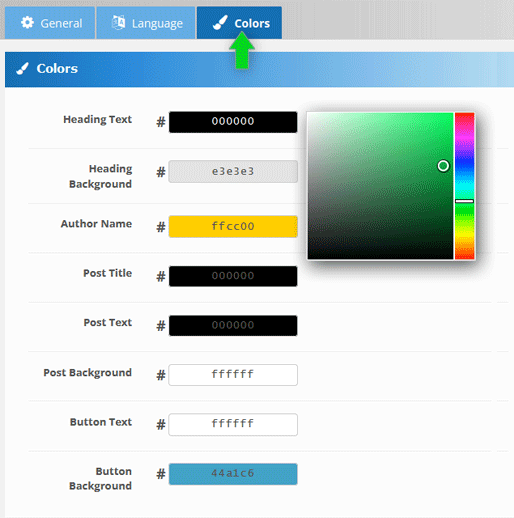
The Color tab allows you to configure the colors of the blog interface in a matter of seconds, thanks to the color picker and the reference image that shows you the names of the various parts of the blog.
You will have a blog perfectly integrated with the style of your site, without having to edit any css files.
Add a module
Weblog allows you to add four different types of modules:
- Post Module;
- Category Module;
- Search module;
- Tag Module.
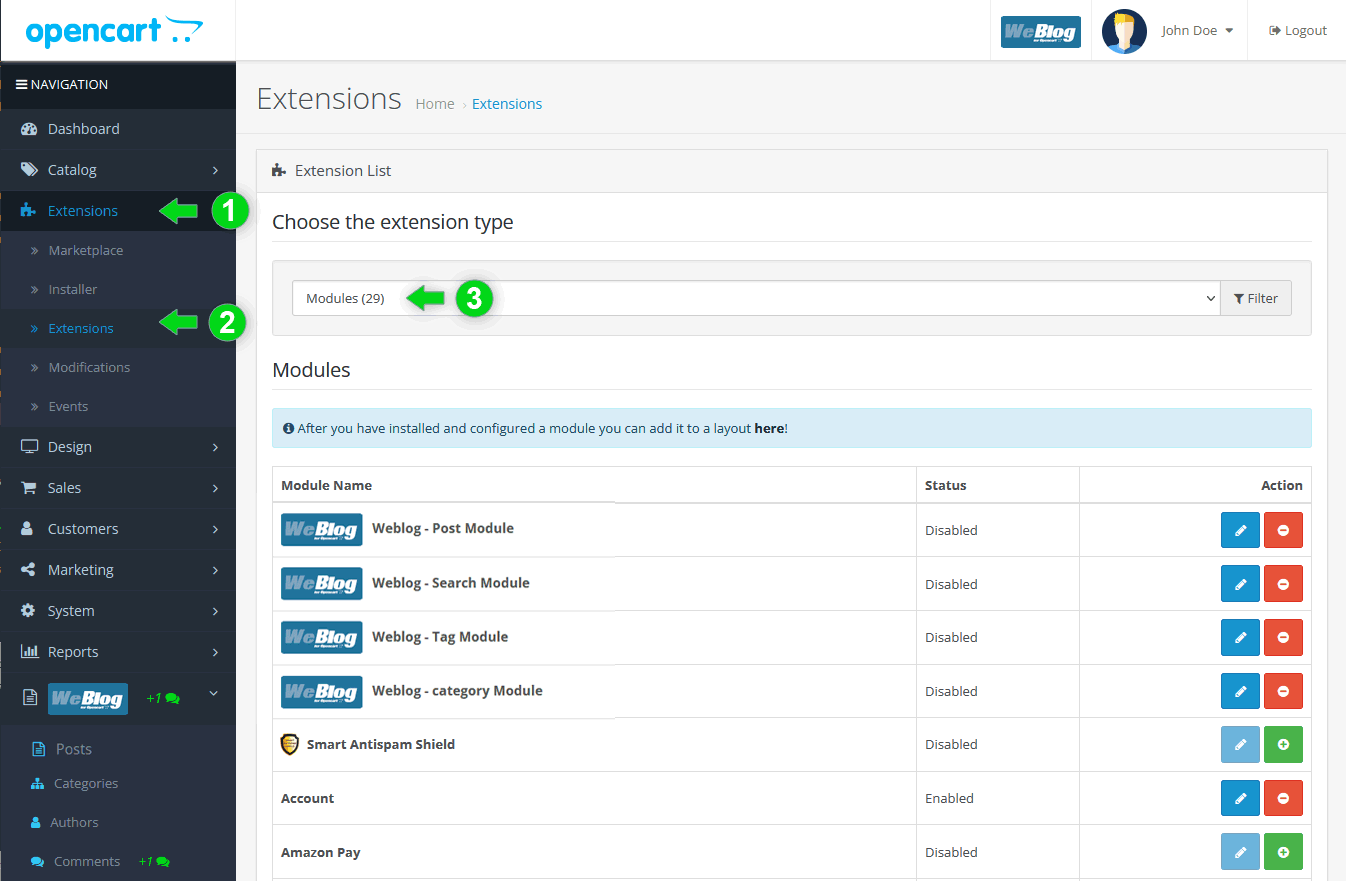
To install a module, open the Admin panel, go to Extensions > Extensions -> Modules and choose the module you want to install and configure.
Post Module
This module allows you to display one of these types of posts lists:
- Latest posts;
- Popular posts;
- Posts from a blog category.
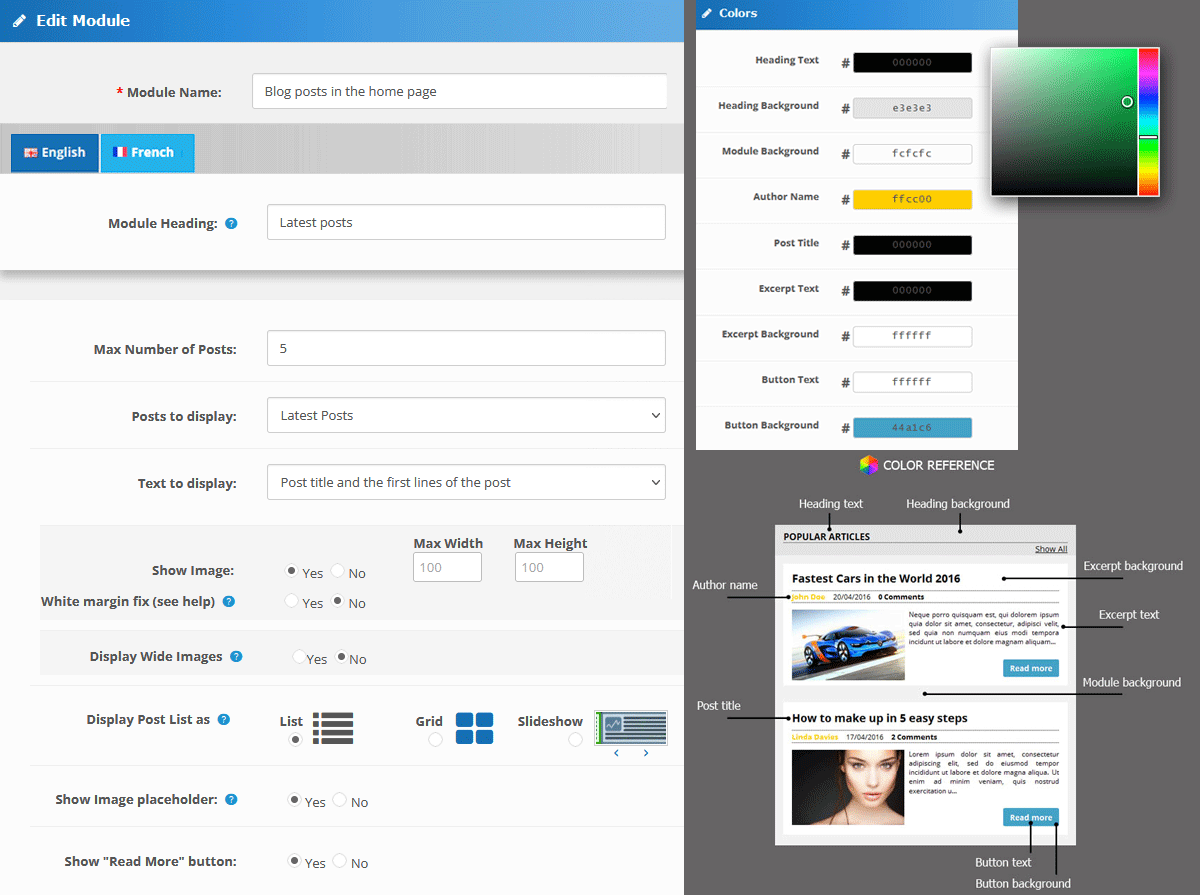
You can set the maximum number of posts to display, display posts as list, grid or slideshow, show or hide post images, set their sizes and display a placeholder where post images are not set.
The option Text to display sets the post content to show:
- Post title;
- Post title and the first lines of the post text;
- Post title and meta tag description.
Also the Read more button can be shown or hidden. If it's not visible, the user can open the post page by clicking on the post title or image.
Category Module
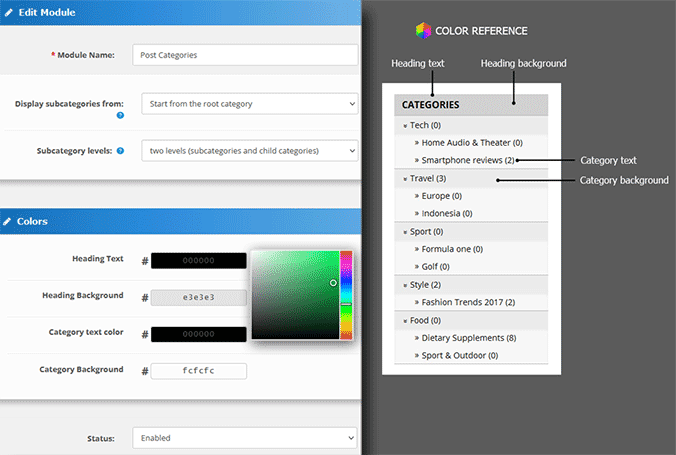
The Category Module displays a box with your blog category list.
You can choose to display the whole category list, or just a list of subcategories of a given parent category.
You can also choose how many sub levels of categories to show:
- only first level categories: useful when you have too many nested categories, and you want to limit the view just to the main categories;
- first and second level categories: when you want to display a more detailed category list;
The color picker helps you configure the style of the module.
Search Module
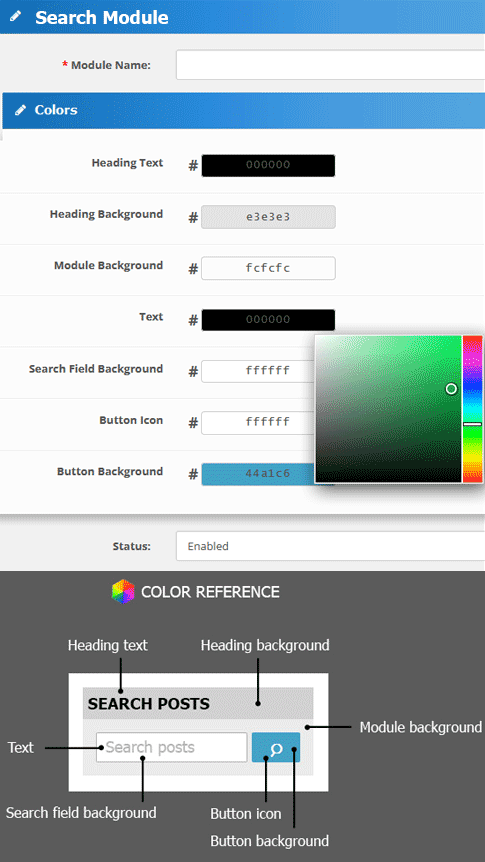
The search module requires only the setup of a name and style.
Tag Module
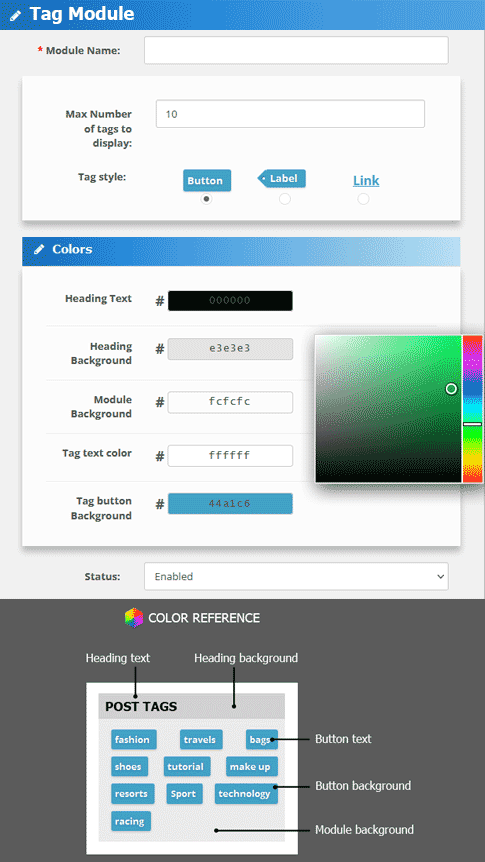
This module collects all the tags set in the post pages, sorts them by relevance (the most frequent tags are shown first), and displays them in the module.
You can set the maximum number of tags to display, style (button, label or link) and colors.
Adding a module to layouts
Once you have configured a module, you can add it to Layouts.
From the Admin panel, go to Design > Layouts, choose the layout where you want to add the module, then add it in one of the available positions (Content Top, Content Bottom, Column Left, Column Right), and save.
Note: Some third party themes have their own layout config page, in that case, to add a module follow the instructions of your theme.
Authors
The first step to take to start writing posts is to add an author.
From the left menu of the Admin panel, go to Weblog > Authors. From this page you can:
- Add a new author;
- Delete an existing author;
- Filter authors by author name, date added, status;
- Edit an author;
- View author profiles on the front end.
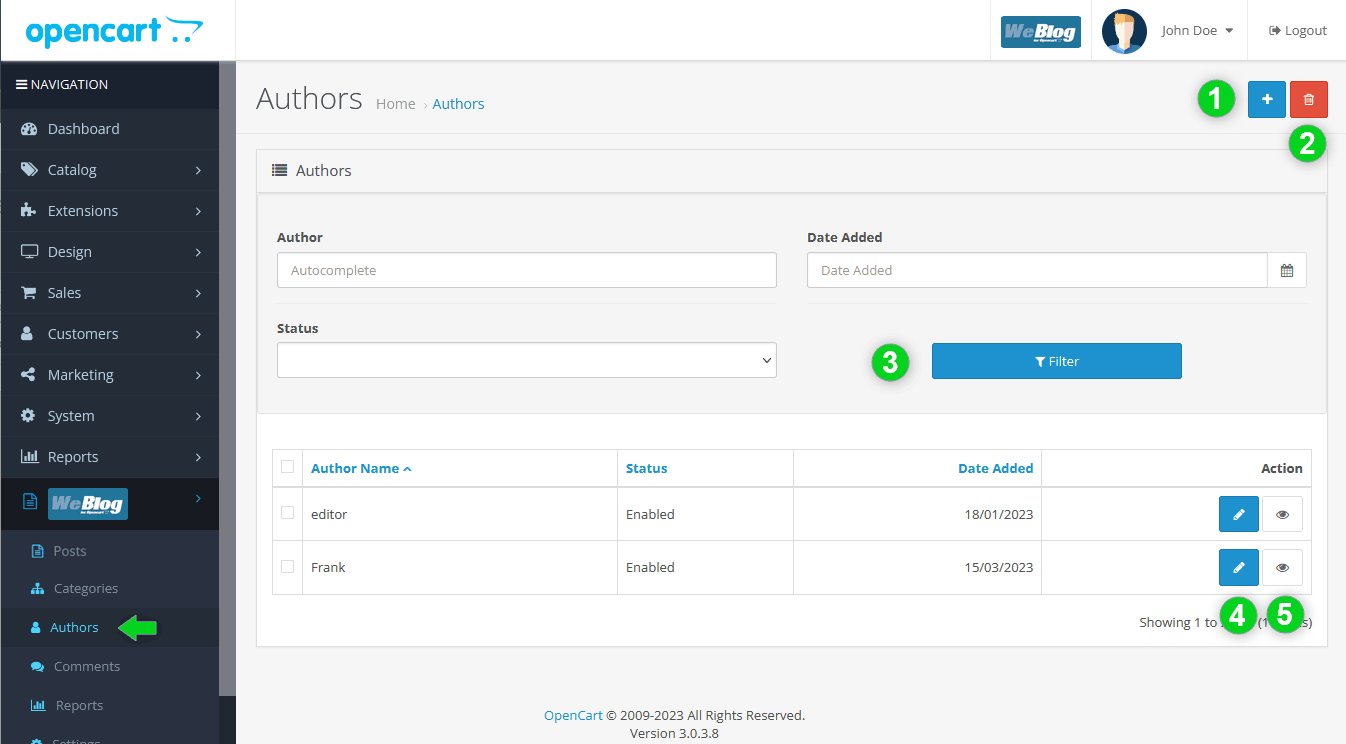
Add a new author
To add a new author, click on the plus button (1), then enter an author name, a seo keyword for the author page link (you can leave it empty to generate it automatically).
In order for the author to be able to publish posts, the status option must be set to enabled.
Note: when you disable an author, all his posts will be hidden.
You can also add a description that will be used as text in the author profile, a meta tag description and meta tag keywords, to help search engines to better index the page.
Delete an author
To delete one or more authors, from the Author list page select the checkbox next to each author's name you want to delete, then click on the Delete button (2).
View author's page
To view an author's page, click on the eye shaped icon (5).
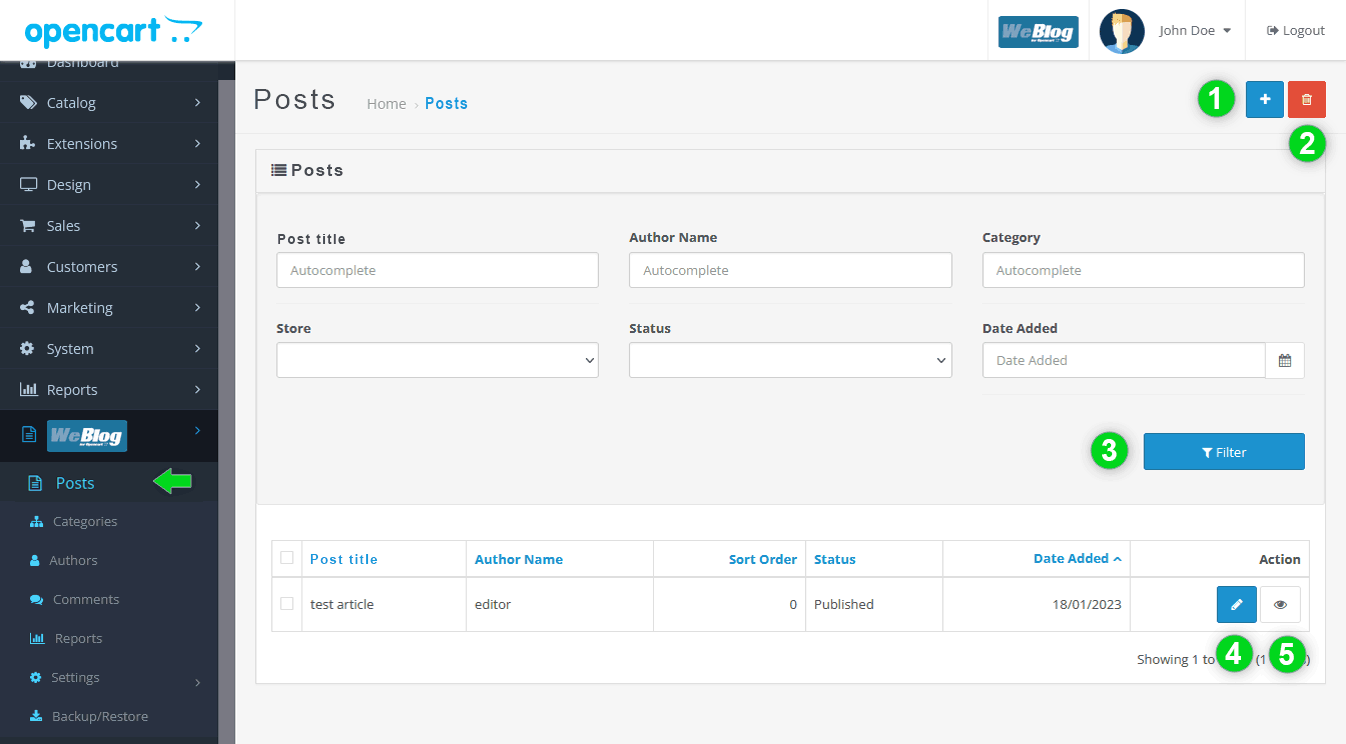
Posts
After adding an author you are ready to write posts.
From the left menu of the Admin panel, go to Weblog > Posts. From this page you can:
- Add a new post;
- Delete posts;
- Filter posts by post title, author name, category, store, date added, status;
- Edit posts;
- View posts on the front end.
Edit a blog post
The Post edit page has three sections:
- General tab
- Data tab
- Link tab
General tab
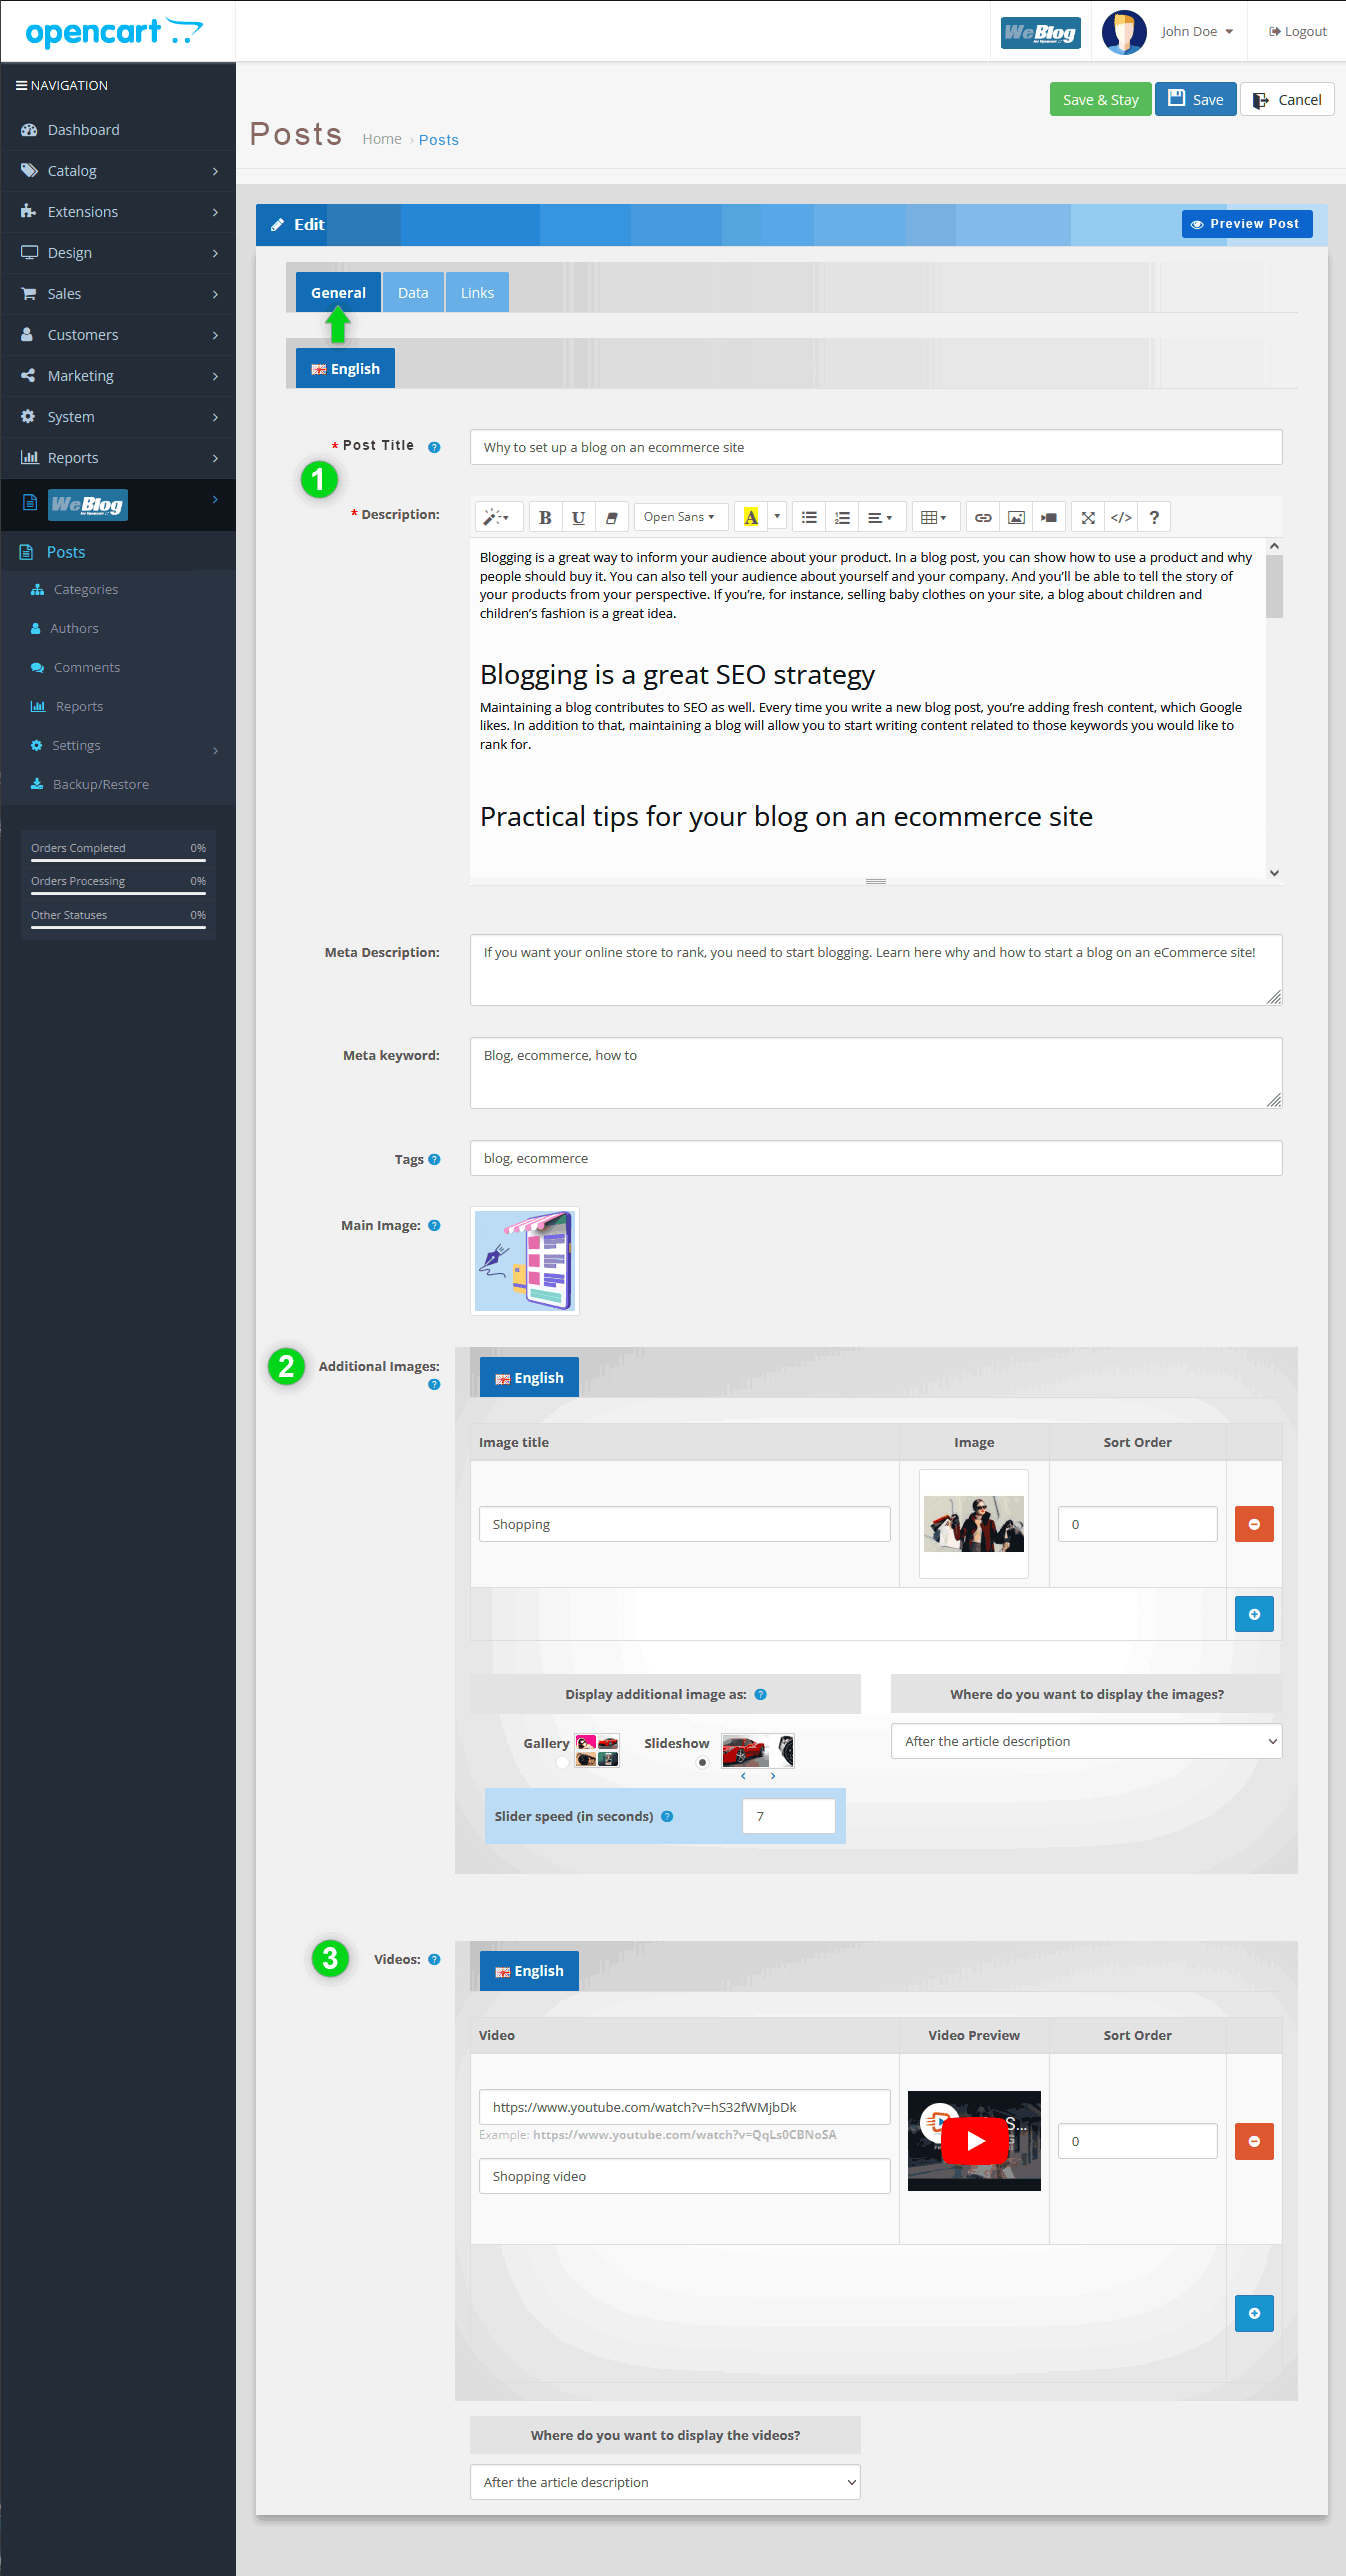
This section allows you to configure texts and images of your post:
- Post title
- Description
- Meta Description
- Meta Keywords
- Main image
- Additional images
- Videos
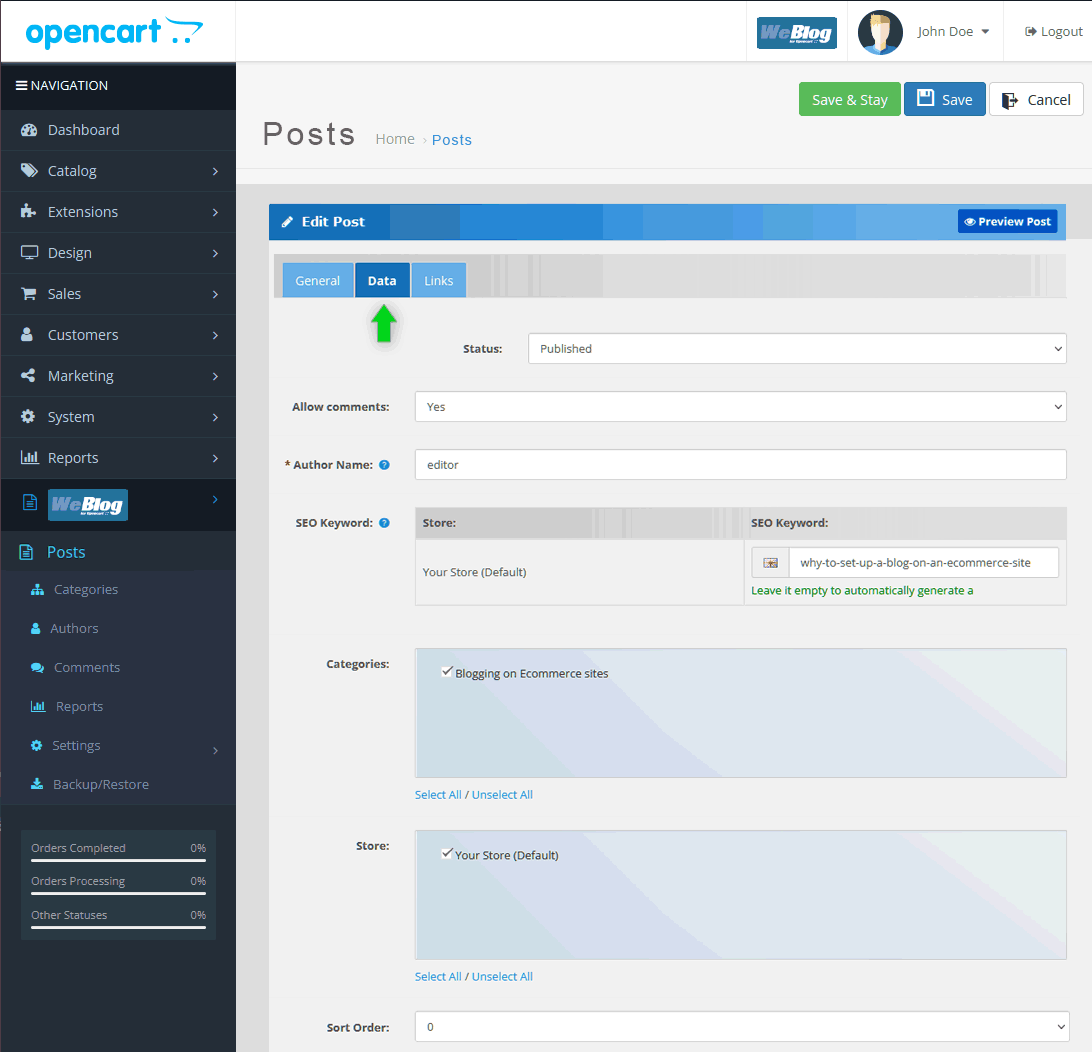
Data tab
The options available on this tab are:
- Status: published/unpublished;
- Allow comments: Show/hide post comments;
- Author name: it's a field with the auto-complete feature, it shows a list of available authors as you type;
- Seo keyword: it's the last part of the page url, if you leave it empty it can be generated automatically;
- Categories: the blog categories where you want the post to be published;
- Store: it shows the list of stores where you can publish the post;
- Sort order: it comes handy when you want to publish posts in a certain order.
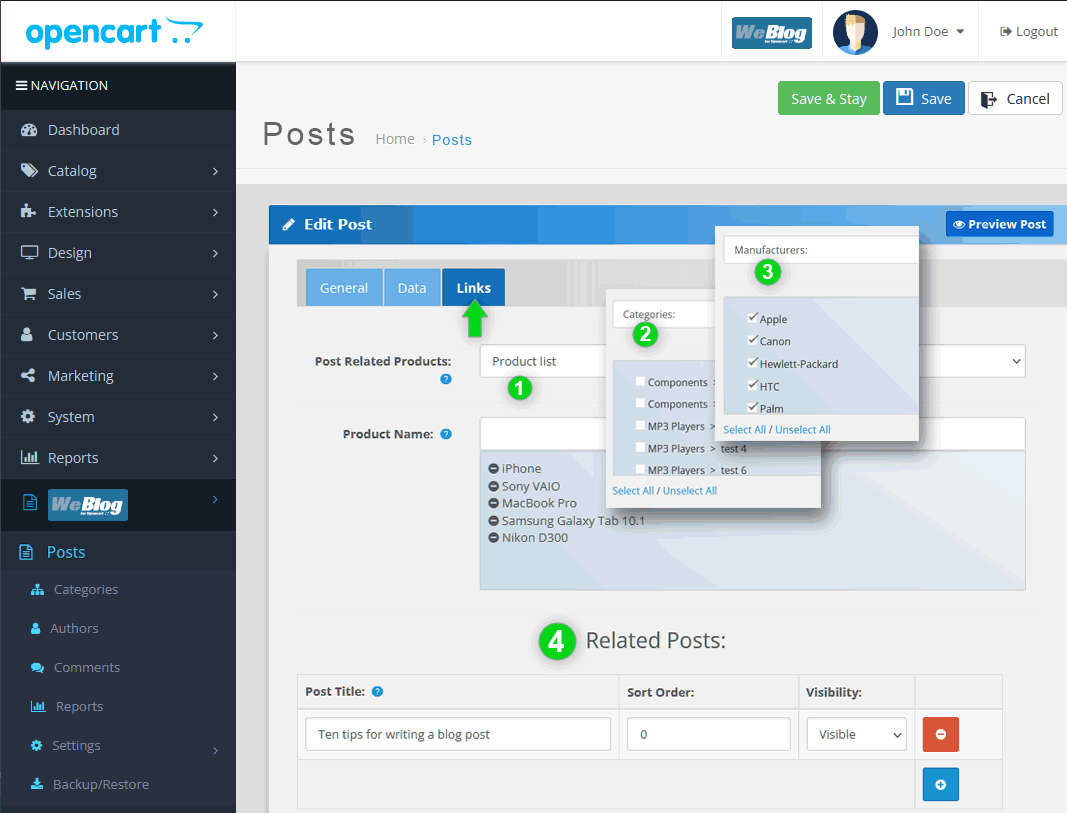
Link tab
From this tab you can link posts and products to your post:
-
Post Related Products:
- Product list: creates a product list from the store catalog. The text field has the auto-complete feature;
- Product Categories: shows products from the selected product categories;
- Product Manufacturers: shows products from selected manufacturers.
- Related Posts (4): links related posts to the current one.
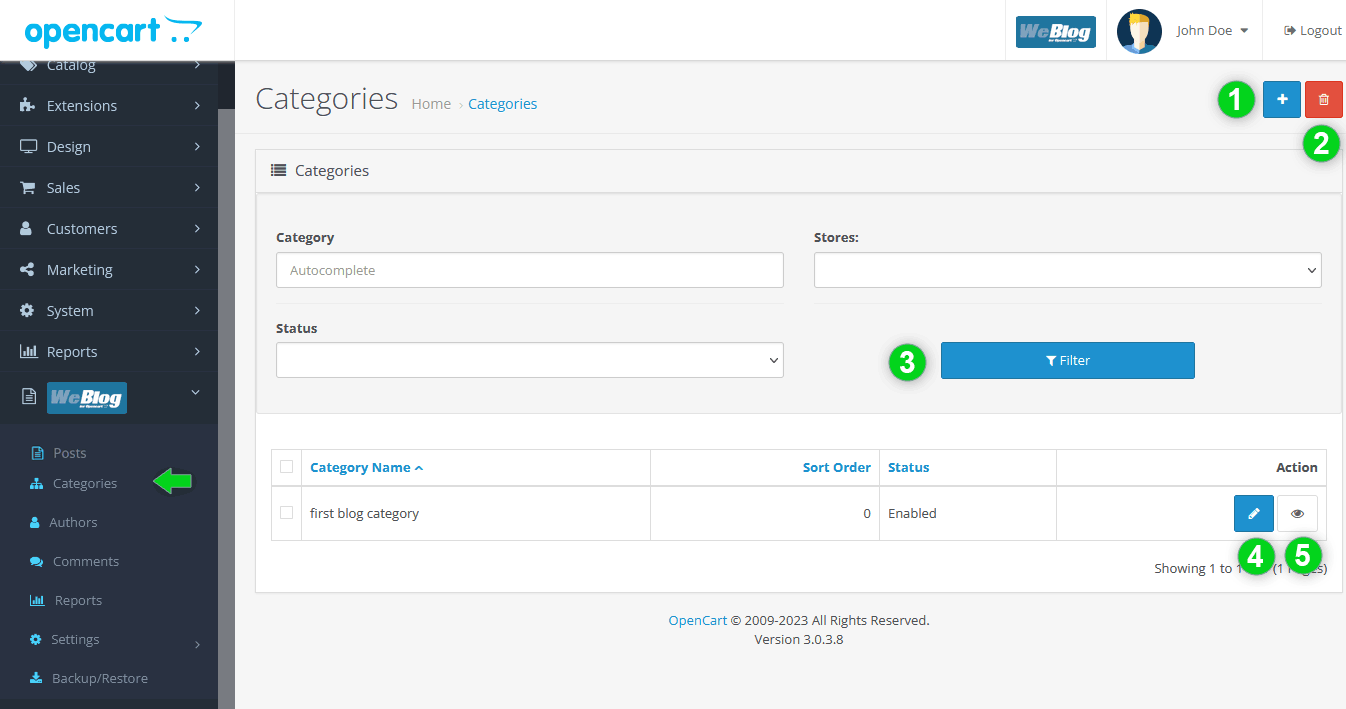
Categories
Categories allow you to better organize your posts. Categories can contain posts and subcategories.
From the left menu of the Admin panel, go to Weblog > Categories. From this page you can:
- Add a new category;
- Delete categories;
- Filter posts by category name, store, status;
- Edit categories;
- View category pages on the front end.
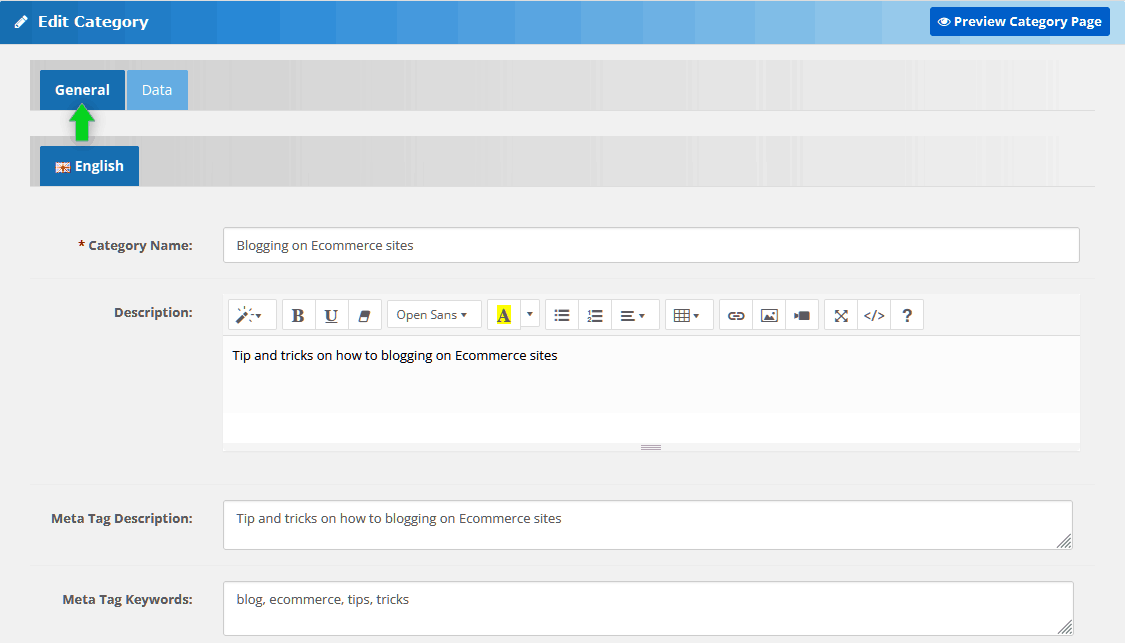
General tab
This section allows you to configure the following parts of the category page:
- Category name
- Description
- Meta Description
- Meta Keywords
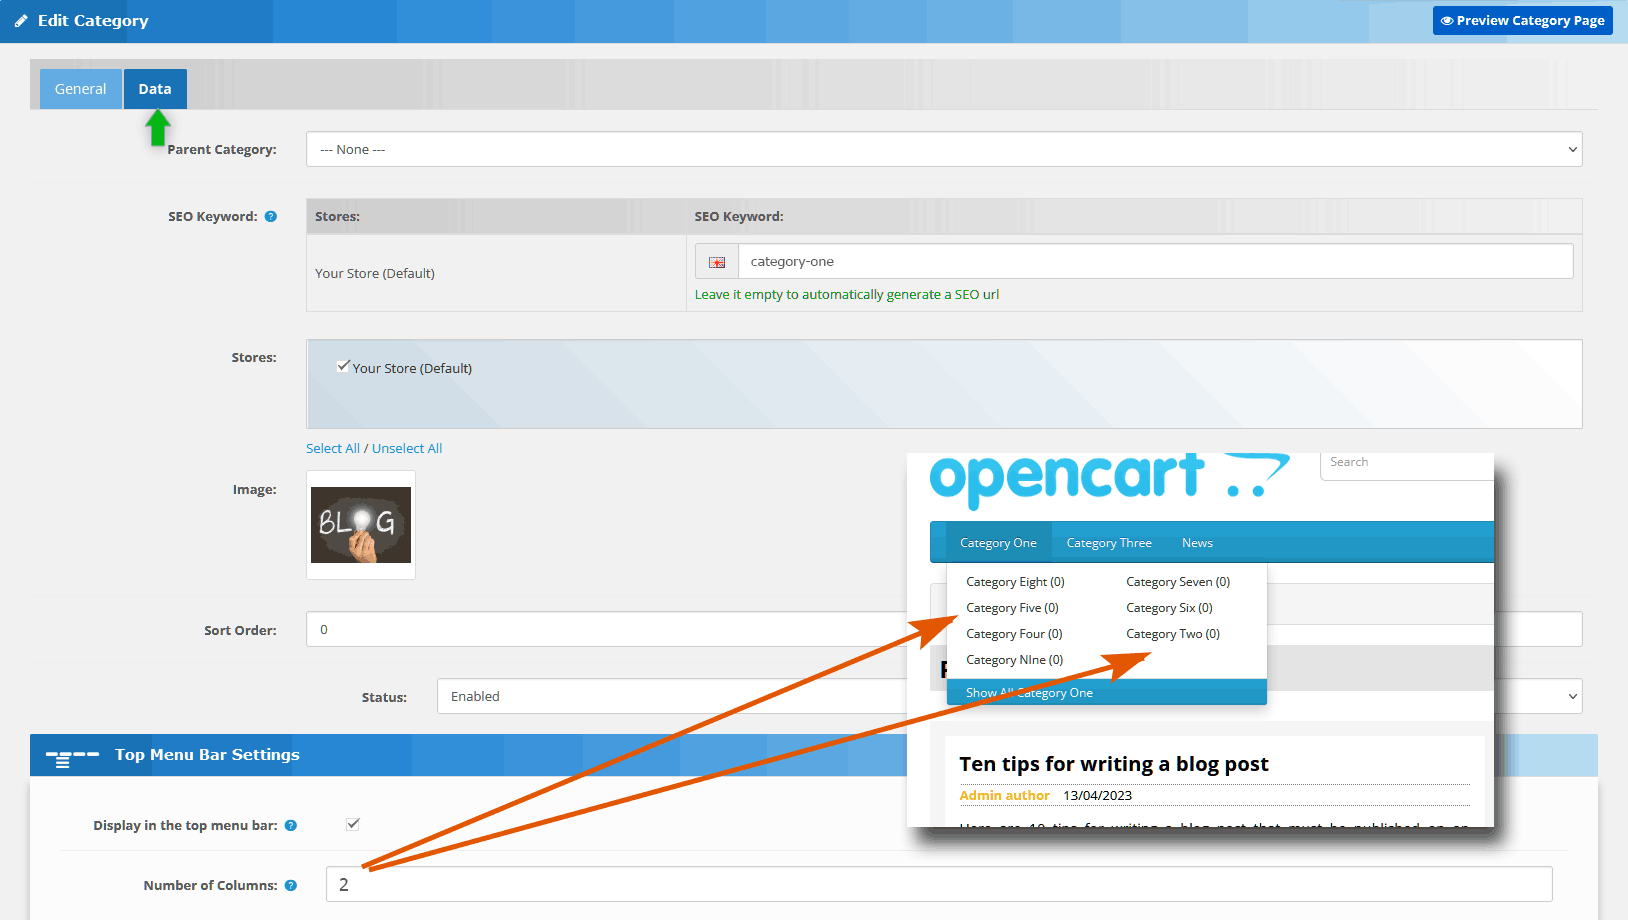
Data tab
From the Data tab you can set:
- Parent Category;
- Seo Keyword: category seo url, it can be generated automatically if you leave the field empty;
- Stores: stores where you want to show the category;
- Image: picture displayed on the category page;
- Sort Order: when you have a category list, this value is used to manage the sort order;
- Status.
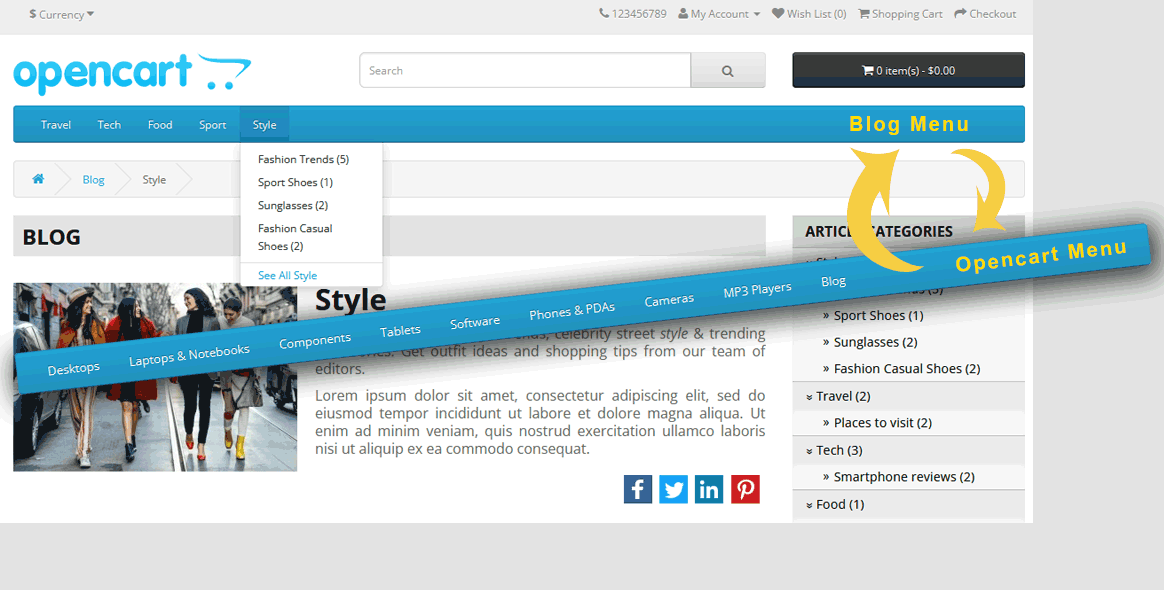
Top Menu Bar Settings
The following settings are available only when the Weblog Menu Bar is active.
To activate the menu bar, go to Weblog > Settings > General Settings, then open General Tab > Weblog Top Menu Bar and select Display Weblog Menu Bar.
Note: Weblog Menu Bar is available only on blog pages. Click here for more info.
There are two settings that allow you to control the category in the menu:
- Display in the top menu bar: Enabled / Disabled;
- Number of columns: Number of columns into which to split the parent category drop-down menu. For example, the figure below shows the drop down menu divided into 2 columns.
Note: This feature only works for top parent categories.
Comments
This extension supports two types of comment systems, Weblog comments and Facebook comments.
This section is about Weblog comments, for Facebook comments and to know how to switch between the two system refer here.
From the left menu of the Admin panel, go to Weblog > Comments. From this page you can:
- Add a new comment (comments can be also added by the administrator from the admin panel);
- Delete comments;
- Filter comments by Post Title, Author, Replies awaiting for approval, Date and Status;
- Edit comments.
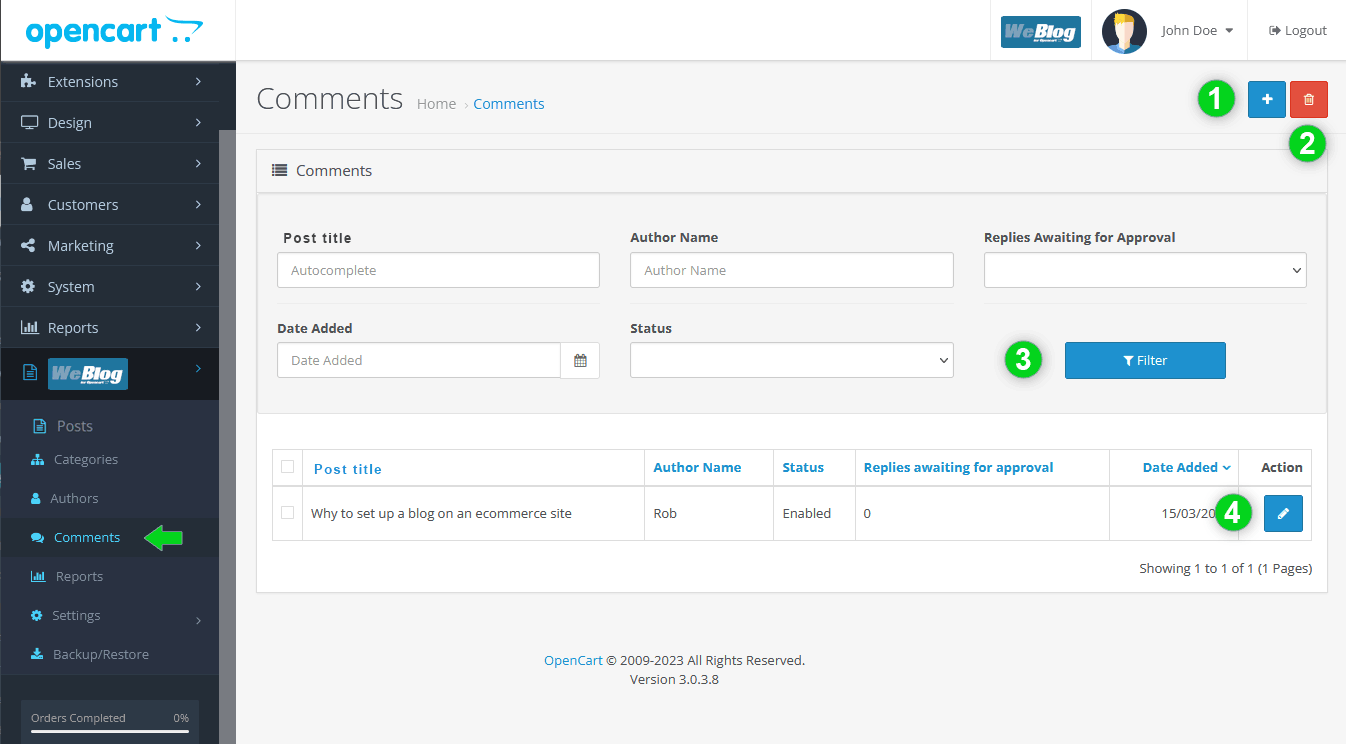
![]() When new comments are posted without having been moderated yet, a green icon appears next to the Weblog menu indicating the number of new comments to be checked.
When new comments are posted without having been moderated yet, a green icon appears next to the Weblog menu indicating the number of new comments to be checked.
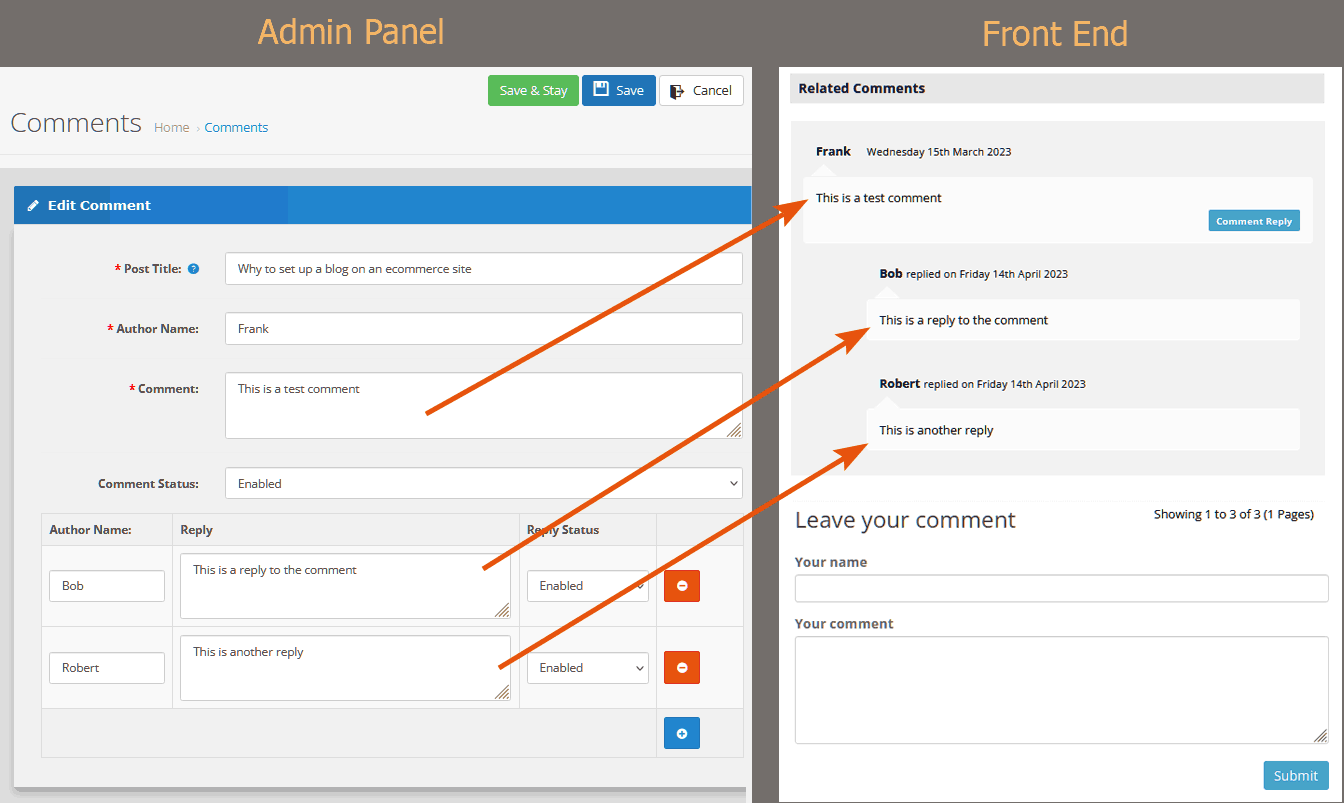
Edit a comment
From the Comment Edit page you can moderate a comment, edit its text and replies.
The image below shows an example of comment with two replies (on the left the Admin panel and on the right the front end result).
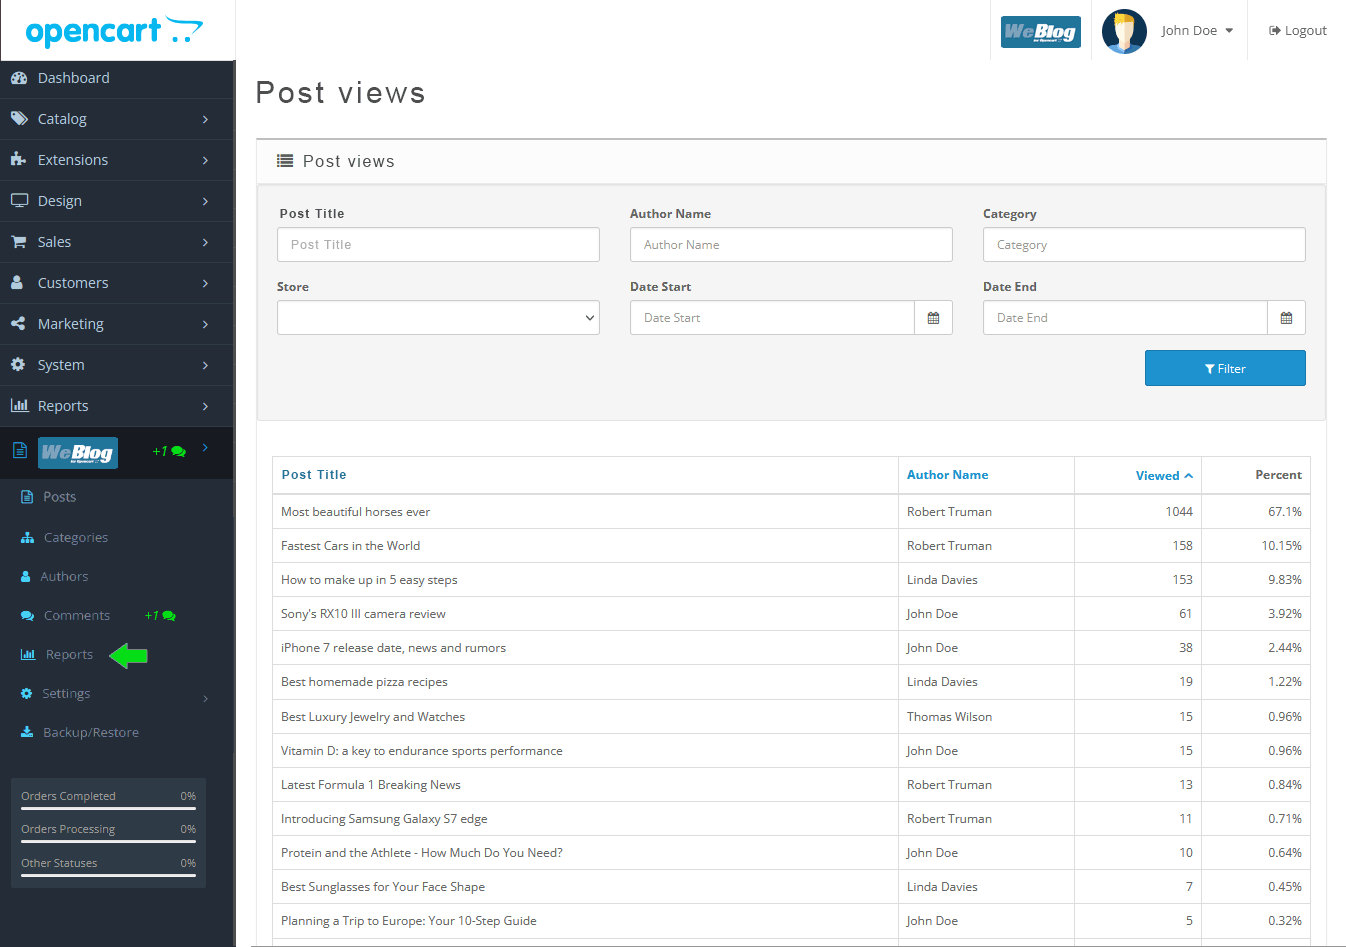
Reports
This page allows you to keep track of the number of views of your posts, to understand which ones are having the most success and which ones need to be optimized to improve visibility on the web.
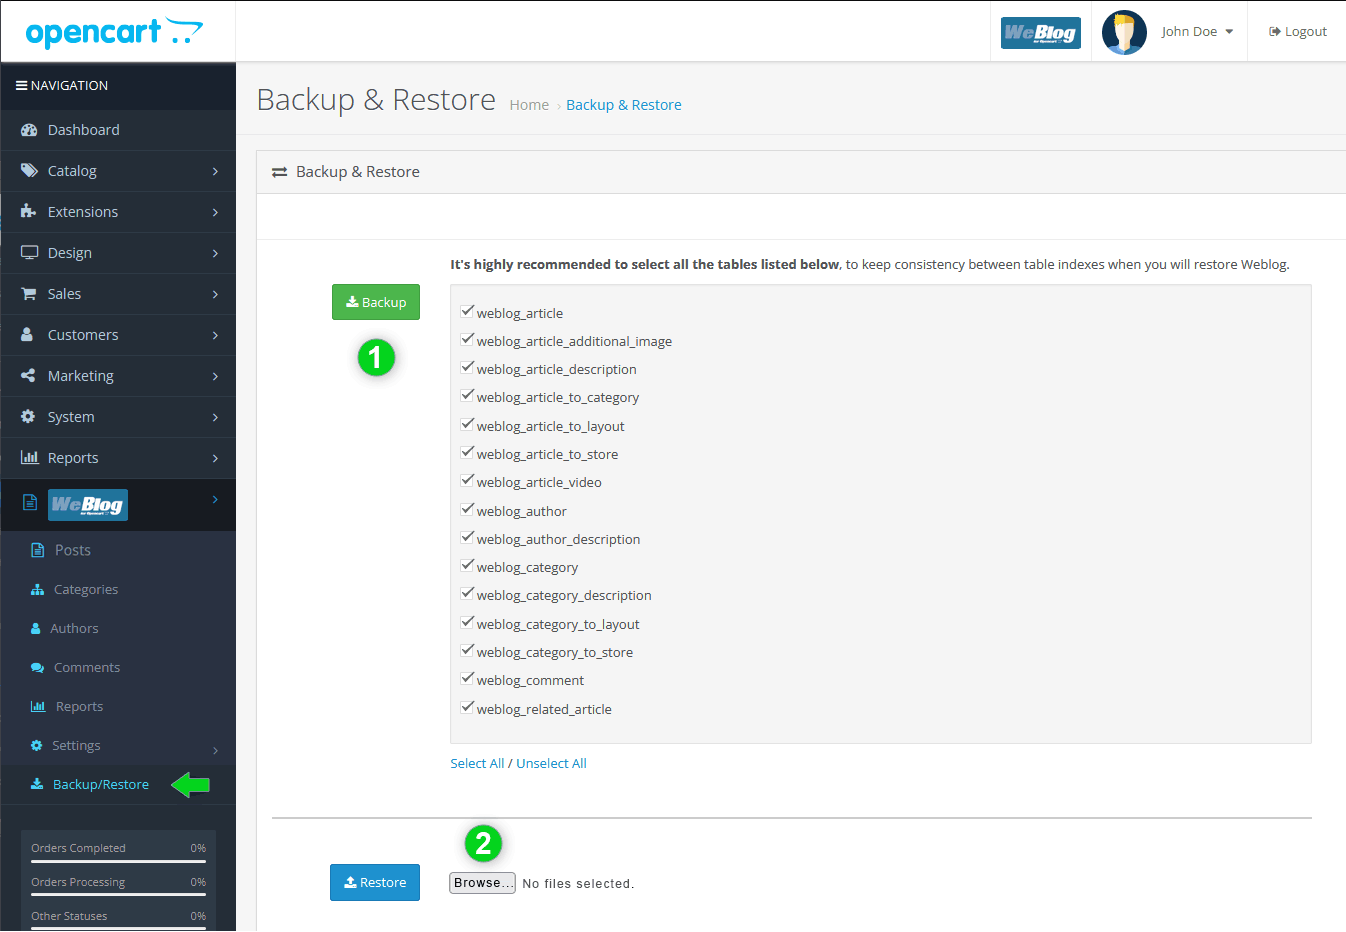
Backup & Restore
Weblog allows you to backup and restore your entire blog without accessing directly to the database.
Backup
To make a full backup, select the checkboxes for all the listed database tables (1), then click on backup. You will be prompted to save the backup to a file.
Restore
To restore a previous backup, click on the Browse button (2) and upload a previously saved backup file.
CUSTOMIZATION
Product boxes and third party themes
Post pages allow to display post related products. On some themes the style of product boxes could not match with your theme style. To fix it follow these instructions.
Opencart 2 Instructions
- Make a backup of the file: catalog/view/theme/YOUR_THEME/template/module/latest.tpl;
- Open the original file latest.tpl with a text editor;
- Find the "foreach" loop, it's something like this:
<?php foreach ($products as $product) { ?><div class="product-layout col-lg-3 col-md-3 col-sm-6 col-xs-12"> <div class="product-thumb transition"> <div class="image"><a href="<?php echo $product['href']; ?>"><img src="<?php echo $product['thumb']; ?>" alt="<?php echo $product['name']; ?>" title="<?php echo $product['name']; ?>" class="img-responsive" /></a></div> <div class="caption"> <h4><a href="<?php echo $product['href']; ?>"><?php echo $product['name']; ?></a></h4> <p><?php echo $product['description']; ?></p> <?php if ($product['rating']) { ?> <div class="rating"> <?php for ($i = 1; $i <= 5; $i++) { ?> <?php if ($product['rating'] < $i) { ?> <span class="fa fa-stack"><i class="fa fa-star-o fa-stack-2x"></i></span> <?php } else { ?> <span class="fa fa-stack"><i class="fa fa-star fa-stack-2x"></i><i class="fa fa-star-o fa-stack-2x"></i></span> <?php } ?> <?php } ?> </div> <?php } ?> <?php if ($product['price']) { ?> <p class="price"> <?php if (!$product['special']) { ?> <?php echo $product['price']; ?> <?php } else { ?> <span class="price-new"><?php echo $product['special']; ?></span> <span class="price-old"><?php echo $product['price']; ?></span> <?php } ?> <?php if ($product['tax']) { ?> <span class="price-tax"><?php echo $text_tax; ?> <?php echo $product['tax']; ?></span> <?php } ?> </p> <?php } ?> </div> <div class="button-group"> <button type="button" onclick="cart.add('<?php echo $product['product_id']; ?>');"><i class="fa fa-shopping-cart"></i> <span class="hidden-xs hidden-sm hidden-md"><?php echo $button_cart; ?></span></button> <button type="button" data-toggle="tooltip" title="<?php echo $button_wishlist; ?>" onclick="wishlist.add('<?php echo $product['product_id']; ?>');"><i class="fa fa-heart"></i></button> <button type="button" data-toggle="tooltip" title="<?php echo $button_compare; ?>" onclick="compare.add('<?php echo $product['product_id']; ?>');"><i class="fa fa-exchange"></i></button> </div> </div> </div><?php } ?> - Copy the content of that "foreach" loop.
- Now open the file: catalog/view/theme/default/template/weblog/inc.product_box.tpl and delete the whole content;
- Paste the content previously copied (the block of code in pink) from the file latest.tpl of your theme and save the file.